Looking to reach out to your customers on mobile? Join us for our live streamed discussion on February 10th, 1:05pm EST with Mary Meeker, Partner at Kleiner Perkins, Google’s Dennis Woodside, SVP of Americas Operations, and Jason Spero, Head of Americas Mobile Advertising on the future of mobile and mobile marketing. To learn more about the event and live stream, please visit the Google Mobile Ads blog.
Posted by Suzanne Mumford, Google Mobile Ads Marketing Team

Priority Inbox in Gmail for mobile
If you’ve ever cursed a phone’s tiny screen as utterly inadequate for sifting through an overflowing inbox you’ll be pleased to hear that the Gmail mobile web app now supports Priority Inbox. Priority Inbox helps combat information overload by automatically identifying your important messages so you can focus on those first. Until today it was only available on the desktop and on Android devices.
Now, once you set up Priority Inbox in the desktop version of Gmail, you’ll see Priority Inbox sections when you visit gmail.com from your phone’s browser and click on the ‘Menu’ screen. You’ll also see importance markers in your inbox, so you can quickly identify which messages are important.

This feature is available for most mobile browsers that support HTML5, such as devices running Android 1.5+ and iOS 3+. Currently, you can’t set up Priority Inbox or mark messages as important or unimportant from here. If you have suggestions or want to learn more, visit our Help Center and forum.
Posted by Nathan Bullock, Software Engineer
Now, once you set up Priority Inbox in the desktop version of Gmail, you’ll see Priority Inbox sections when you visit gmail.com from your phone’s browser and click on the ‘Menu’ screen. You’ll also see importance markers in your inbox, so you can quickly identify which messages are important.
This feature is available for most mobile browsers that support HTML5, such as devices running Android 1.5+ and iOS 3+. Currently, you can’t set up Priority Inbox or mark messages as important or unimportant from here. If you have suggestions or want to learn more, visit our Help Center and forum.
Posted by Nathan Bullock, Software Engineer
The Android 3.0 Fragments API
[This post is by Dianne Hackborn, a Software Engineer who sits very near the exact center of everything Android. — Tim Bray]

An important goal for Android 3.0 is to make it easier for developers to write applications that can scale across a variety of screen sizes, beyond the facilities already available in the platform:
Since the beginning, Android’s UI framework has been designed around the use of layout managers, allowing UIs to be described in a way that will adjust to the space available. A common example is a ListView whose height changes depending on the size of the screen, which varies a bit between QVGA, HVGA, and WVGA aspect ratios.
Android 1.6 introduced a new concept of screen densities, making it easy for apps to scale between different screen resolutions when the screen is about the same physical size. Developers immediately started using this facility when higher-resolution screens were introduced, first on Droid and then on other phones.
Android 1.6 also made screen sizes accessible to developers, classifying them into buckets: “small” for QVGA aspect ratios, “normal” for HVGA and WVGA aspect ratios, and “large” for larger screens. Developers can use the resource system to select between different layouts based on the screen size.
The combination of layout managers and resource selection based on screen size goes a long way towards helping developers build scalable UIs for the variety of Android devices we want to enable. As a result, many existing handset applications Just Work under Honeycomb on full-size tablets, without special compatibility modes, with no changes required. However, as we move up into tablet-oriented UIs with 10-inch screens, many applications also benefit from a more radical UI adjustment than resources can easily provide by themselves.
Introducing the Fragment
Android 3.0 further helps applications adjust their interfaces with a new class called Fragment. A Fragment is a self-contained component with its own UI and lifecycle; it can be-reused in different parts of an application’s user interface depending on the desired UI flow for a particular device or screen.
In some ways you can think of a Fragment as a mini-Activity, though it can’t run independently but must be hosted within an actual Activity. In fact the introduction of the Fragment API gave us the opportunity to address many of the pain points we have seen developers hit with Activities, so in Android 3.0 the utility of Fragment extends far beyond just adjusting for different screens:
Embedded Activities via ActivityGroup were a nice idea, but have always been difficult to deal with since Activity is designed to be an independent self-contained component instead of closely interacting with other activities. The Fragment API is a much better solution for this, and should be considered as a replacement for embedded activities.
Retaining data across Activity instances could be accomplished through Activity.onRetainNonConfigurationInstance(), but this is fairly klunky and non-obvious. Fragment replaces that mechanism by allowing you to retain an entire Fragment instance just by setting a flag.
A specialization of Fragment called DialogFragment makes it easy to show a Dialog that is managed as part of the Activity lifecycle. This replaces Activity’s “managed dialog” APIs.
Another specialization of Fragment called ListFragment makes it easy to show a list of data. This is similar to the existing ListActivity (with a few more features), but should reduce the common question about how to show a list with some other data.
The information about all fragments currently attached to an activity is saved for you by the framework in the activity’s saved instance state and restored for you when it restarts. This can greatly reduce the amount of state save and restore code you need to write yourself.
The framework has built-in support for managing a back-stack of Fragment objects, making it easy to provide intra-activity Back button behavior that integrates the existing activity back stack. This state is also saved and restored for you automatically.
Getting started
To whet your appetite, here is a simple but complete example of implementing multiple UI flows using fragments. We first are going to design a landscape layout, containing a list of items on the left and details of the selected item on the right. This is the layout we want to achieve:

The code for this activity is not interesting; it just calls setContentView() with the given layout:
<LinearLayout xmlns:android="http://schemas.android.com/apk/res/android"
        android:orientation="horizontal"
        android:layout_width="match_parent"
        android:layout_height="match_parent">

    <fragment class="com.example.android.apis.app.TitlesFragment"
            android:id="@+id/titles" android:layout_weight="1"
            android:layout_width="0px"
            android:layout_height="match_parent" />

    <FrameLayout android:id="@+id/details" android:layout_weight="1"
            android:layout_width="0px"
            android:layout_height="match_parent" />

</LinearLayout>
You can see here our first new feature: the <fragment> tag allows you to automatically instantiate and install a Fragment subclass into your view hierarchy. The fragment being implemented here derives from ListFragment, displaying and managing a list of items the user can select. The implementation below takes care of displaying the details of an item either in-place or as a separate activity, depending on the UI layout. Note how changes to fragment state (the currently shown details fragment) are retained across configuration changes for you by the framework.
public static class TitlesFragment extends ListFragment {
    boolean mDualPane;
    int mCurCheckPosition = 0;

    @Override
    public void onActivityCreated(Bundle savedState) {
        super.onActivityCreated(savedState);

        // Populate list with our static array of titles.
        setListAdapter(new ArrayAdapter<String>(getActivity(),
                R.layout.simple_list_item_checkable_1,
                Shakespeare.TITLES));

        // Check to see if we have a frame in which to embed the details
        // fragment directly in the containing UI.
        View detailsFrame = getActivity().findViewById(R.id.details);
        mDualPane = detailsFrame != null
                && detailsFrame.getVisibility() == View.VISIBLE;

        if (savedState != null) {
            // Restore last state for checked position.
            mCurCheckPosition = savedState.getInt("curChoice", 0);
        }

        if (mDualPane) {
            // In dual-pane mode, list view highlights selected item.
            getListView().setChoiceMode(ListView.CHOICE_MODE_SINGLE);
            // Make sure our UI is in the correct state.
            showDetails(mCurCheckPosition);
        }
    }

    @Override
    public void onSaveInstanceState(Bundle outState) {
        super.onSaveInstanceState(outState);
        outState.putInt("curChoice", mCurCheckPosition);
    }

    @Override
    public void onListItemClick(ListView l, View v, int pos, long id) {
        showDetails(pos);
    }

    /**
     * Helper function to show the details of a selected item, either by
     * displaying a fragment in-place in the current UI, or starting a
     * whole new activity in which it is displayed.
     */
    void showDetails(int index) {
        mCurCheckPosition = index;

        if (mDualPane) {
            // We can display everything in-place with fragments.
            // Have the list highlight this item and show the data.
            getListView().setItemChecked(index, true);

            // Check what fragment is shown, replace if needed.
            DetailsFragment details = (DetailsFragment)
                    getFragmentManager().findFragmentById(R.id.details);
            if (details == null || details.getShownIndex() != index) {
                // Make new fragment to show this selection.
                details = DetailsFragment.newInstance(index);

                // Execute a transaction, replacing any existing
                // fragment with this one inside the frame.
                FragmentTransaction ft
                        = getFragmentManager().beginTransaction();
                ft.replace(R.id.details, details);
                ft.setTransition(
                        FragmentTransaction.TRANSIT_FRAGMENT_FADE);
                ft.commit();
            }

        } else {
            // Otherwise we need to launch a new activity to display
            // the dialog fragment with selected text.
            Intent intent = new Intent();
            intent.setClass(getActivity(), DetailsActivity.class);
            intent.putExtra("index", index);
            startActivity(intent);
        }
    }
}
For this first screen we need an implementation of DetailsFragment, which simply shows a TextView containing the text of the currently selected item.
public static class DetailsFragment extends Fragment {
    /**
     * Create a new instance of DetailsFragment, initialized to
     * show the text at 'index'.
     */
    public static DetailsFragment newInstance(int index) {
        DetailsFragment f = new DetailsFragment();

        // Supply index input as an argument.
        Bundle args = new Bundle();
        args.putInt("index", index);
        f.setArguments(args);

        return f;
    }

    public int getShownIndex() {
        return getArguments().getInt("index", 0);
    }

    @Override
    public View onCreateView(LayoutInflater inflater,
            ViewGroup container, Bundle savedInstanceState) {
        if (container == null) {
            // Currently in a layout without a container, so no
            // reason to create our view.
            return null;
        }

        ScrollView scroller = new ScrollView(getActivity());
        TextView text = new TextView(getActivity());
        int padding = (int)TypedValue.applyDimension(
                TypedValue.COMPLEX_UNIT_DIP,
                4, getActivity().getResources().getDisplayMetrics());
        text.setPadding(padding, padding, padding, padding);
        scroller.addView(text);
        text.setText(Shakespeare.DIALOGUE[getShownIndex()]);
        return scroller;
    }
}
It is now time to add another UI flow to our application. When in portrait orientation, there is not enough room to display the two fragments side-by-side, so instead we want to show only the list like this:

With the code shown so far, all we need to do here is introduce a new layout variation for portrait screens like so:
<FrameLayout xmlns:android="http://schemas.android.com/apk/res/android"
        android:layout_width="match_parent"
        android:layout_height="match_parent">
    <fragment class="com.example.android.apis.app.TitlesFragment"
            android:id="@+id/titles"
            android:layout_width="match_parent"
            android:layout_height="match_parent" />
</FrameLayout>
The TitlesFragment will notice that it doesn’t have a container in which to show its details, so show only its list. When you tap on an item in the list we now need to go to a separate activity in which the details are shown.

With the DetailsFragment already implemented, the implementation of the new activity is very simple because it can reuse the same DetailsFragment from above:
public static class DetailsActivity extends FragmentActivity {

    @Override
    protected void onCreate(Bundle savedInstanceState) {
        super.onCreate(savedInstanceState);

        if (getResources().getConfiguration().orientation
                == Configuration.ORIENTATION_LANDSCAPE) {
            // If the screen is now in landscape mode, we can show the
            // dialog in-line so we don't need this activity.
            finish();
            return;
        }

        if (savedInstanceState == null) {
            // During initial setup, plug in the details fragment.
            DetailsFragment details = new DetailsFragment();
            details.setArguments(getIntent().getExtras());
            getSupportFragmentManager().beginTransaction().add(
                    android.R.id.content, details).commit();
        }
    }
}
Put that all together, and we have a complete working example of an application that fairly radically changes its UI flow based on the screen it is running on, and can even adjust it on demand as the screen configuration changes.
This illustrates just one way fragments can be used to adjust your UI. Depending on your application design, you may prefer other approaches. For example, you could put your entire application in one activity in which you change the fragment structure as its state changes; the fragment back stack can come in handy in this case.
More information on the Fragment and FragmentManager APIs can be found in the Android 3.0 SDK documentation. Also be sure to look at the ApiDemos app under the Resources tab, which has a variety of Fragment demos covering their use for alternative UI flow, dialogs, lists, populating menus, retaining across activity instances, the back stack, and more.
Fragmentation for all!
For developers starting work on tablet-oriented applications designed for Android 3.0, the new Fragment API is useful for many design situations that arise from the larger screen. Reasonable use of fragments should also make it easier to adjust the resulting application’s UI to new devices in the future as needed -- for phones, TVs, or wherever Android appears.
However, the immediate need for many developers today is probably to design applications that they can provide for existing phones while also presenting an improved user interface on tablets. With Fragment only being available in Android 3.0, their shorter-term utility is greatly diminished.
To address this, we plan to have the same fragment APIs (and the new LoaderManager as well) described here available as a static library for use with older versions of Android; we’re trying to go right back to 1.6. In fact, if you compare the code examples here to those in the Android 3.0 SDK, they are slightly different: this code is from an application using an early version of the static library fragment classes which is running, as you can see on the screenshots, on Android 2.3. Our goal is to make these APIs nearly identical, so you can start using them now and, at whatever point in the future you switch to Android 3.0 as your minimum version, move to the platform’s native implementation with few changes in your app.
We don’t have a firm date for when this library will be available, but it should be relatively soon. In the meantime, you can start developing with fragments on Android 3.0 to see how they work, and most of that effort should be transferable.
New Merchandising and Billing Features on Android Market
[This post is by Eric Chu, Android Developer Ecosystem. —Dirk Dougherty]
Following on last week’s announcement of the Android 3.0 Preview SDK, I’d like to share some more good news with you about three important new features on Android Market.
Android Market on the Web

Starting today, we have extended Android Market client from mobile devices to every desktop. Anyone can now easily find and share applications from their favorite browser. Once users select an application they want, it will automatically be downloaded to their Android-powered devices over-the-air.
Android Market on the Web dramatically expands the discoverability of applications through a rich browsing experience, suggestion-guided searching, deep linking, social sharing, and other merchandising features.
We are releasing the initial version of Android Market on the Web in English and will be extending it to other languages in the weeks ahead.
If you have applications published on Android Market, we encourage you to visit the site and review how they are presented. If you need additional information about what assets you should provide, please visit Android Market Help Center.
You can access Android Market on the Web at:
Buyer’s Currency
Android Market lets you sell applications to users in 32 buyer countries around the world. Today we’re introducing Buyer’s Currency to give you more control over how you price your products across those countries. This feature lets you price your applications differently in each market and improves the purchase experience for buyers by showing prices in their home currencies.
We’ll be rolling out Buyer’s Currency in stages, starting with developers in the U.S. and reaching developers in other countries shortly after. We anticipate it will take approximately four months for us to complete this process.
We encourage you to watch for the appearance of new Buyer’s Currency options in the Android Market publishing console and set prices as soon as possible.
In-app Billing
After months of hard work by the Android Market team, I am extremely pleased to announce the arrival of In-app Billing on Android Market. This new service gives developers more ways to monetize their applications through new billing models including try-and-buy, virtual goods, upgrades, and more.
The In-app Billing service manages billing transactions between apps and users, providing a consistent purchasing experience with familiar forms of payment across all apps. At the same time, it gives you full control over how your digital goods are purchased and tracked. You can let Android Market manage and track the purchases for you or you can integrate with your own back-end service to verify and track purchases in the way that's best for your app.
We’ll be launching In-app Billing in stages. Beginning today, we are providing detailed documentation and a sample application to help you get familiar with the service. Over the next few weeks we’ll be rolling out updates to the Android Market client that will enable you to test against the In-app Billing service. Before the end of this quarter, the service will be live for users, to enable you to start monetizing your applications with this new capability. For complete information about the rollout, see the release information in the In-app Billing documentation.
Helping developers merchandise and monetize their products is a top priority for the Android Market team. We will continue to work hard to to make it the best marketplace for your to distribute your products. For now, we hope you’ll check out these new features to help you better deliver your products through Android Market.
Introducing the Android Market website
Over the past two years, developers around the world have helped make Android Market the go-to place for more than 100,000 apps, games and widgets. Previously, you could only access Android Market directly from your device, but today, we are introducing the Android Market website that lets you browse and search for great apps right from your web browser.

The website makes it easy to discover great new apps with a bigger, brighter interface. You can also send apps directly to your Android device with just a few clicks—no wires needed. We’ve built in new social features, too. You can share apps with your friends through Twitter. And you can read and post app reviews directly to Android Market from the web or from your device.
And what about all those apps you’ve already purchased and downloaded? Sign in to the website with your Google account and click “My Market Account” to see all the apps you’ve purchased or downloaded. It makes managing all your apps quite easy.
The Android Market website was officially unveiled today during an event at Google headquarters where we showcased Honeycomb (Android 3.0), our latest Android release built from the ground up for tablets. Honeycomb has a completely redesigned user interface, with more interactive notifications and widgets, improved multi-tasking, and the latest and greatest Google Mobile services optimized for tablets. We also showed off pre-release applications optimized for Honeycomb, from over 17 developers including:
Stay tuned for more at Mobile World Congress (February 14) in Barcelona where you'll see more than 50 developers demoing their latest phone and tablet apps at the Android booth in Hall 8.

The website makes it easy to discover great new apps with a bigger, brighter interface. You can also send apps directly to your Android device with just a few clicks—no wires needed. We’ve built in new social features, too. You can share apps with your friends through Twitter. And you can read and post app reviews directly to Android Market from the web or from your device.
And what about all those apps you’ve already purchased and downloaded? Sign in to the website with your Google account and click “My Market Account” to see all the apps you’ve purchased or downloaded. It makes managing all your apps quite easy.
The Android Market website was officially unveiled today during an event at Google headquarters where we showcased Honeycomb (Android 3.0), our latest Android release built from the ground up for tablets. Honeycomb has a completely redesigned user interface, with more interactive notifications and widgets, improved multi-tasking, and the latest and greatest Google Mobile services optimized for tablets. We also showed off pre-release applications optimized for Honeycomb, from over 17 developers including:
- AccuWeather
- CNN
- Disney Mobile
- The Economist
- Fuze box
- Glu Mobile
- Google Body
- Grocery iQ
- Intuit
- Ngmoco
- Pulse News
- Quickoffice
- Time Magazine
- TouchType
- Trendy Entertainment
- War Drum Studios
- Weatherbug
- Zynga
Stay tuned for more at Mobile World Congress (February 14) in Barcelona where you'll see more than 50 developers demoing their latest phone and tablet apps at the Android booth in Hall 8.
Announcing Google Shopper for iPhone
(Cross-posted on the Google Merchant Blog)
- Learn more about products and read relevant user reviews
- Compare prices at online and local stores
- Save and share products for later consideration


Once you’ve selected a product result, you can compare prices across web retailers, and even find where you can purchase the item nearby, which is especially useful for those of us who are last-minute shoppers. For some retailers, we also provide inventory information so you can see if a particular store branch has the item in stock, has limited availability, or if the item is out of stock and you should head to a different store.


If you’re not sure about making a purchase or are building out a gift list, you can “star” products for future consideration. You can also share items with friends across your social network to let them know about products you love or great deals you've found.
You can download Google Shopper for free in the App Store. Shopper is available for iPhone 3GS and iPhone 4 with iOS 4.0+ in English only for the United States and the UK.
We hope you enjoy shopping with Google Shopper!
Check in with Google Latitude
(Cross-posted with the Official Google Blog)
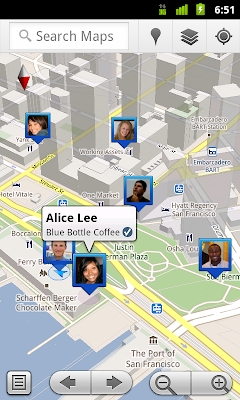
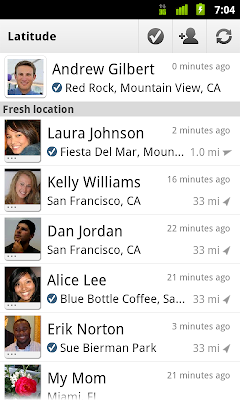
We first introduced Google Latitude to help you stay in touch with your friends and family by making it easy to share where you are. For the 10 million people actively using Latitude each month, this “where” has been a location on a map. Starting today in Google Maps 5.1 for Android, you can also connect that location to a real place by checking in there using Latitude.
Connecting your location with places
You can still use Latitude to automatically update and share your location, but check-ins let you add context to the location—like captions to a photo. For example, I live in San Francisco but often travel around the world. Until today, sharing my location let friends and family know if I was across the globe or in their neighborhood. Now, check-ins let them see the cool restaurant I’m trying in Taipei or join me for a latte at the cafe nearby.
Not your typical check-ins
Because you can use Latitude to automatically detect your location, we’ve added a few twists to checking in to make it really easy:
Explore your world one check-in at a time
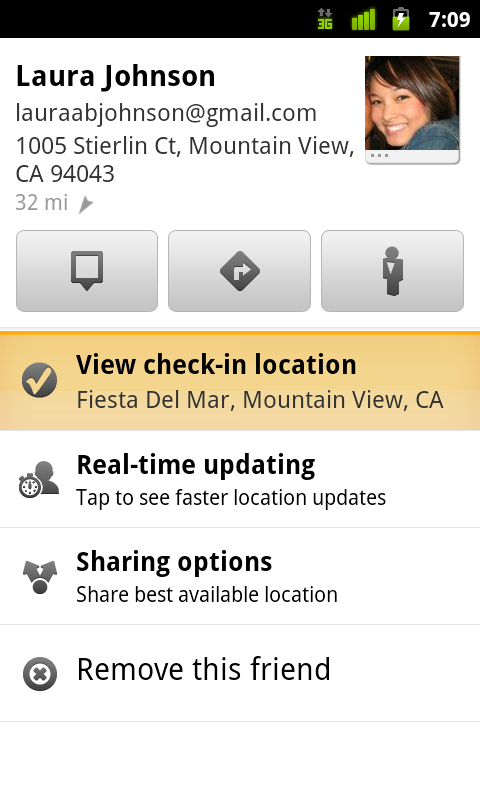
Latitude is built right into Google Maps for Android so check-ins work across Latitude and Maps seamlessly. For example, check in at that new hamburger joint, and you’ll see its Place page with reviews to help you order. When friends check in at a place, you can go straight from their Latitude profile to its Place page to learn about it, fire up Google Maps Navigation (Beta) for turn-by-turn directions to them, and more.
You can also check in at a favorite place to earn special status there; you’ll see if you’ve become a “Regular,” a “VIP” or a “Guru” on its Place page. Keep checking in to hold onto your status or reach the next level.

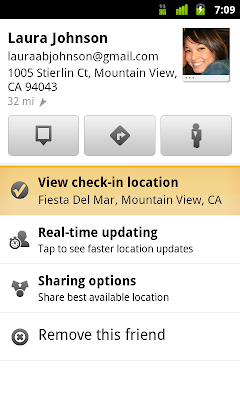
Of course, we thought carefully about how to make checking in to places quick and easy while giving you control over your privacy. Just like when sharing your location with Latitude, checking in is 100% opt-in, and you can choose to share any check-in with your friends on Latitude, publicly on the web and your Google profile, or just yourself. Learn more about checking in and managing your check-ins with Latitude in the Help Center. Coming later this week, you’ll also be able to see your complete history of check-ins using the optional History tab at google.com/latitude from your computer.
Update (2/11/2011): You can now see check-ins and your own check-in history at google.com/latitude from your computer.


Start checking in by downloading the latest Google Maps from Android Market (on Android 1.6+; tap here if you're on your phone) and then joining Latitude from the main menu. You can check in everywhere Maps and Latitude are already available. If you’re using the new Latitude app for iPhone, you’ll see your friends’ check-ins, and we’ll update the app soon so you can check in too.
Just the beginning...
Checking in from Latitude is just one step in helping you connect the places you go with the people you care about. We believe in letting you use or share your location however you like, and we’re working on making location and check-ins useful in more places—across Google and the web.
Posted by Joe LaPenna, Software Engineer, Google Latitude Team
We first introduced Google Latitude to help you stay in touch with your friends and family by making it easy to share where you are. For the 10 million people actively using Latitude each month, this “where” has been a location on a map. Starting today in Google Maps 5.1 for Android, you can also connect that location to a real place by checking in there using Latitude.
Connecting your location with places
You can still use Latitude to automatically update and share your location, but check-ins let you add context to the location—like captions to a photo. For example, I live in San Francisco but often travel around the world. Until today, sharing my location let friends and family know if I was across the globe or in their neighborhood. Now, check-ins let them see the cool restaurant I’m trying in Taipei or join me for a latte at the cafe nearby.

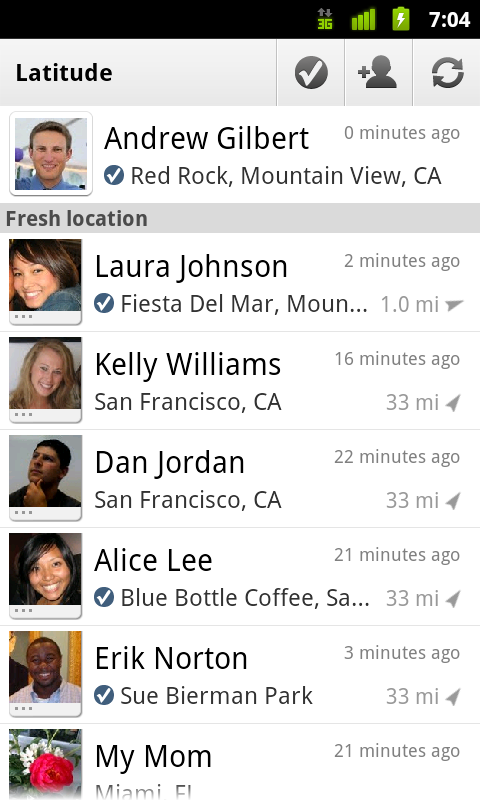
See where your friends are on a map and where they’re checking in.
Because you can use Latitude to automatically detect your location, we’ve added a few twists to checking in to make it really easy:
- Notifications: Turn on check-in notifications in Latitude’s settings and get a notification to check in at a nearby place once you arrive. Never forget to check in again.
- Automatic check-ins: Choose to automatically check in at specific places you designate, and you’ll be checked in when you’re there. You can talk to friends or finish your bagel without fumbling with your phone.
- Check out: Once you leave, Latitude knows to automatically check you out of places so friends aren’t left guessing if you’re still there.
Explore your world one check-in at a time
Latitude is built right into Google Maps for Android so check-ins work across Latitude and Maps seamlessly. For example, check in at that new hamburger joint, and you’ll see its Place page with reviews to help you order. When friends check in at a place, you can go straight from their Latitude profile to its Place page to learn about it, fire up Google Maps Navigation (Beta) for turn-by-turn directions to them, and more.
You can also check in at a favorite place to earn special status there; you’ll see if you’ve become a “Regular,” a “VIP” or a “Guru” on its Place page. Keep checking in to hold onto your status or reach the next level.

Latitude check-ins are built right into Google Maps and Place pages.
Update (2/11/2011): You can now see check-ins and your own check-in history at google.com/latitude from your computer.


Choose options for individual check-ins or turn on and off notifications in the Latitude settings.
Start checking in by downloading the latest Google Maps from Android Market (on Android 1.6+; tap here if you're on your phone) and then joining Latitude from the main menu. You can check in everywhere Maps and Latitude are already available. If you’re using the new Latitude app for iPhone, you’ll see your friends’ check-ins, and we’ll update the app soon so you can check in too.
Just the beginning...
Checking in from Latitude is just one step in helping you connect the places you go with the people you care about. We believe in letting you use or share your location however you like, and we’re working on making location and check-ins useful in more places—across Google and the web.
Posted by Joe LaPenna, Software Engineer, Google Latitude Team
Subscribe to:
Posts (Atom)