Introducing ViewPropertyAnimator

[This post is by Chet Haase, an Android engineer who specializes in graphics and animation, and who occasionally posts videos and articles on these topics on his CodeDependent blog at graphics-geek.blogspot.com. — Tim Bray]

In an earlier article, Animation in Honeycomb, I talked about the new property animation system available as of Android 3.0. This new animation system makes it easy to animate any kind of property on any object, including the new properties added to the View class in 3.0. In the 3.1 release, we added a small utility class that makes animating these properties even easier.

First, if you’re not familiar with the new View properties such as alpha and translationX, it might help for you to review the section in that earlier article that discusses these properties entitled, rather cleverly, “View properties”. Go ahead and read that now; I’ll wait.

Okay, ready?

Refresher: Using ObjectAnimator

Using the ObjectAnimator class in 3.0, you could animate one of the View properties with a small bit of code. You create the Animator, set any optional properties such as the duration or repetition attributes, and start it. For example, to fade an object called myView out, you would animate the alpha property like this:

    ObjectAnimator.ofFloat(myView, "alpha", 0f).start();

This is obviously not terribly difficult, either to do or to understand. You’re creating and starting an animator with information about the object being animated, the name of the property to be animated, and the value to which it’s animating. Easy stuff.

But it seemed that this could be improved upon. In particular, since the View properties will be very commonly animated, we could make some assumptions and introduce some API that makes animating these properties as simple and readable as possible. At the same time, we wanted to improve some of the performance characteristics of animations on these properties. This last point deserves some explanation, which is what the next paragraph is all about.

There are three aspects of performance that are worth improving about the 3.0 animation model on View properties. One of the elements concerns the mechanism by which we animate properties in a language that has no inherent concept of “properties”. The other performance issues relate to animating multiple properties. When fading out a View, you may only be animating the alpha property. But when a view is being moved on the screen, both the x and y (or translationX and translationY) properties may be animated in parallel. And there may be other situations in which several properties on a view are animated in parallel. There is a certain amount of overhead per property animation that could be combined if we knew that there were several properties being animated.

The Android runtime has no concept of “properties”, so ObjectAnimator uses a technique of turning a String denoting the name of a property into a call to a setter function on the target object. For example, the String “alpha” gets turned into a reference to the setAlpha() method on View. This function is called through either reflection or JNI, mechanisms which work reliably but have some overhead. But for objects and properties that we know, like these properties on View, we should be able to do something better. Given a little API and knowledge about each of the properties being animated, we can simply set the values directly on the object, without the overhead associated with reflection or JNI.

Another piece of overhead is the Animator itself. Although all animations share a single timing mechanism, and thus don’t multiply the overhead of processing timing events, they are separate objects that perform the same tasks for each of their properties. These tasks could be combined if we know ahead of time that we’re running a single animation on several properties. One way to do this in the existing system is to use PropertyValuesHolder. This class allows you to have a single Animator object that animates several properties together and saves on much of the per-Animator overhead. But this approach can lead to more code, complicating what is essentially a simple operation. The new approach allows us to combine several properties under one animation in a much simpler way to write and read.

Finally, each of these properties on View performs several operations to ensure proper invalidation of the object and its parent. For example, translating a View in x invalidates the position that it used to occupy and the position that it now occupies, to ensure that its parent redraws the areas appropriately. Similarly, translating in y invalidates the before and after positions of the view. If these properties are both being animated in parallel, there is duplication of effort since these invalidations could be combined if we had knowledge of the multiple properties being animated. ViewPropertyAnimator takes care of this.

Introducing: ViewPropertyAnimator

ViewPropertyAnimator provides a simple way to animate several properties in parallel, using a single Animator internally. And as it calculates animated values for the properties, it sets them directly on the target View and invalidates that object appropriately, in a much more efficient way than a normal ObjectAnimator could.

Enough chatter: let’s see some code. For the fading-out view example we saw before, you would do the following with ViewPropertyAnimator:

    myView.animate().alpha(0);

Nice. It’s short and it’s very readable. And it’s also easy to combine with other property animations. For example, we could move our view in x and y to (500, 500) as follows:

    myView.animate().x(500).y(500);

There are a couple of things worth noting about these commands:

  • animate(): The magic of the system begins with a call to the new method animate() on the View object. This returns an instance of ViewPropertyAnimator, on which other methods are called which set the animation properties.


  • Auto-start: Note that we didn’t actually start() the animations. In this new API, starting the animations is implicit. As soon as you’re done declaring them, they will all begin. Together. One subtle detail here is that they will actually wait until the next update from the UI toolkit event queue to start; this is the mechanism by which ViewPropertyAnimator collects all declared animations together. As long as you keep declaring animations, it will keep adding them to the list of animations to start on the next frame. As soon as you finish and then relinquish control of the UI thread, the event queue mechanism kicks in and the animations begin.


  • Fluent: ViewPropertyAnimator has a Fluent interface, which allows you to chain method calls together in a very natural way and issue a multi-property animation command as a single line of code. So all of the calls such as x() and y() return the ViewPropertyAnimator instance, on which you can chain other method calls.


You can see from this example that the code is much simpler and more readable. But where do the performance improvements of ViewPropertyAnimator come in?

Performance Anxiety

One of the performance wins of this new approach exists even in this simple example of animating the alpha property. ViewPropertyAnimator uses no reflection or JNI techniques; for example, the alpha() method in the example operates directly on the underlying "alpha" field of a View, once per animation frame.

The other performance wins of ViewPropertyAnimator come in the ability to combine multiple animations. Let’s take a look at another example for this.

When you move a view on the screen, you might animate both the x and y position of the object. For example, this animation moves myView to x/y values of 50 and 100:

    ObjectAnimator animX = ObjectAnimator.ofFloat(myView, "x", 50f);
ObjectAnimator animY = ObjectAnimator.ofFloat(myView, "y", 100f);
AnimatorSet animSetXY = new AnimatorSet();
animSetXY.playTogether(animX, animY);
animSetXY.start();

This code creates two separate animations and plays them together in an AnimatorSet. This means that there is the processing overhead of setting up the AnimatorSet and running two Animators in parallel to animate these x/y properties. There is an alternative approach using PropertyValuesHolder that you can use to combine multiple properties inside of one single Animator:

    PropertyValuesHolder pvhX = PropertyValuesHolder.ofFloat("x", 50f);
PropertyValuesHolder pvhY = PropertyValuesHolder.ofFloat("y", 100f);
ObjectAnimator.ofPropertyValuesHolder(myView, pvhX, pvyY).start();

This approach avoids the multiple-Animator overhead, and is the right way to do this prior to ViewPropertyAnimator. And the code isn’t too bad. But using ViewPropertyAnimator, it all gets easier:

    myView.animate().x(50f).y(100f);

The code, once again, is simpler and more readable. And it has the same single-Animator advantage of the PropertyValuesHolder approach above, since ViewPropertyAnimator runs one single Animator internally to animate all of the properties specified.

But there’s one other benefit of the ViewPropertyAnimator example above that’s not apparent from the code: it saves effort internally as it sets each of these properties. Normally, when the setX() and setY() functions are called on View, there is a certain amount of calculation and invalidation that occurs to ensure that the view hierarchy will redraw the correct region affected by the view that moved. ViewPropertyAnimator performs this calculation once per animation frame, instead of once per property. It sets the underlying x/y properties of View directly and performs the invalidation calculations once for x/y (and any other properties being animated) together, avoiding the per-property overhead necessitated by the ObjectAnimator property approach.

An Example

I finished this article, looked at it ... and was bored. Because, frankly, talking about visual effects really begs having some things to look at. The tricky thing is that screenshots don’t really work when you’re talking about animation. (“In this image, you see that the button is moving. Well, not actually moving, but it was when I captured the screenshot. Really.”) So I captured a video of a small demo application that I wrote, and will through the code for the demo here.

Here’s the video. Be sure to turn on your speakers before you start it. The audio is really the best part.

In the video, the buttons on the upper left (“Fade In”, “Fade Out”, etc.) are clicked one after the other, and you can see the effect that those button clicks have on the button at the bottom (“Animating Button”). All of those animations happen thanks to the ViewPropertyAnimator API (of course). I’ll walk through the code for each of the individual animations below.

When the activity first starts, the animations are set up to use a longer duration than the default. This is because I wanted the animations to last long enough in the video for you to see. Changing the default duration for the animatingButton object is a one-line operation to retrieve the ViewPropertyAnimator for the button and set its duration:

    animatingButton.animate().setDuration(2000);

The rest of the code is just a series of OnClickListenerobjects set up on each of the buttons to trigger its specific animation. I’ll put the complete listener in for the first animation below, but for the rest of them I’ll just put the inner code instead of the listener boilerplate.

The first animation in the video happens when the Fade Out button is clicked, which causes Animating Button to (you guessed it) fade out. Here’s the listener for the fadeOut button which performs this action:

    fadeOut.setOnClickListener(new View.OnClickListener() {
@Override
public void onClick(View v) {
animatingButton.animate().alpha(0);
}
});

You can see, in this code, that we simply tell the object to animate to an alpha of 0. It starts from whatever the current alpha value is.

The next button performs a Fade In action, returning the button to an alpha value of 1 (fully opaque):

    animatingButton.animate().alpha(1);

The Move Over and Move Back buttons perform animations on two properties in parallel: x and y. This is done by chaining calls to those property methods in the animator call. For the Move Over button, we have the following:

    int xValue = container.getWidth() - animatingButton.getWidth();
int yValue = container.getHeight() - animatingButton.getHeight();
animatingButton.animate().x(xValue).y(yValue);

And for the Move Back case (where we just want to return the button to its original place at (0, 0) in its container), we have this code:

    animatingButton.animate().x(0).y(0);

One nuance to notice from the video is that, after the Move Over and Move Back animations were run, I then ran them again, clicking the Move Back animation while the Move Over animation was still executing. The second animation on the same properties (x and y) caused the first animation to cancel and the second animation to start from that point. This is an intentional part of the functionality of ViewPropertyAnimator. It takes your command to animate a property and, if necessary, cancels any ongoing animation on that property before starting the new animation.

Finally, we have the 3D rotation effect, where the button spins twice around the Y (vertical) axis. This is obviously a more complicated action and takes a great deal more code than the other animations (or not):

    animatingButton.animate().rotationYBy(720);

One important thing to notice in the rotation animations in the video is that they happen in parallel with part of the Move animations. That is, I clicked on the Move Over button, then the Rotate button. This caused the movement to stat, and then the Rotation to start while it was moving. Since each animation lasted for two seconds, the rotation animation finished after the movement animation was completed. Same thing on the return trip - the button was still spinning after it settled into place at (0, 0). This shows how independent animations (animations that are not grouped together on the animator at the same time) create a completely separate ObjectAnimator internally, allowing the animations to happen independently and in parallel.

Play with the demo some more, check out the code, and groove to the awesome soundtrack for 16.75. And if you want the code for this incredibly complex application (which really is nothing more than five OnClick listeners wrapping the animator code above), you can download it from here.

And so...

For the complete story on ViewPropertyAnimator, you might want to see the SDK documentation. First, there’s the animate() method in View. Second, there’s the ViewPropertyAnimator class itself. I’ve covered the basic functionality of that class in this article, but there are a few more methods in there, mostly around the various properties of View that it animates. Thirdly, there’s ... no, that’s it. Just the method in View and the ViewPropertyAnimator class itself.

ViewPropertyAnimator is not meant to be a replacement for the property animation APIs added in 3.0. Heck, we just added them! In fact, the animation capabilities added in 3.0 provide important plumbing for ViewPropertyAnimator as well as other animation capabilities in the system overall. And the capabilities of ObjectAnimator provide a very flexible and easy to use facility for animating, well, just about anything! But if you want to easily animate one of the standard properties on View and the more limited capabilities of the ViewPropertyAnimator API suit your needs, then it is worth considering.

Note: I don’t want to get you too worried about the overhead of ObjectAnimator; the overhead of reflection, JNI, or any of the rest of the animator process is quite small compared to what else is going on in your program. it’s just that the efficiencies of ViewPropertyAnimator offer some advantages when you are doing lots of View property animation in particular. But to me, the best part about the new API is the code that you write. It’s the best kind of API: concise and readable. Hopefully you agree and will start using ViewPropertyAnimator for your view property animation needs.

Coming soon: make your phone your wallet

(cross-posted to Official Google Blog and Google Commerce Blog)


Today in our New York City office, along with Citi, MasterCard, First Data and Sprint, we gave a demo of Google Wallet, an app that will make your phone your wallet. You’ll be able to tap, pay and save using your phone and near field communication (NFC). We’re field testing Google Wallet now and plan to release it soon.


Google Wallet is a key part of our ongoing effort to improve shopping for both businesses and consumers. It’s aimed at making it easier for you to pay for and save on the goods you want, while giving merchants more ways to offer coupons and loyalty programs to customers, as well as bridging the gap between online and offline commerce.


Because Google Wallet is a mobile app, it will do more than a regular wallet ever could. You'll be able to store your credit cards, offers, loyalty cards and gift cards, but without the bulk. When you tap to pay, your phone will also automatically redeem offers and earn loyalty points for you. Someday, even things like boarding passes, tickets, ID and keys could be stored in Google Wallet.


At first, Google Wallet will support both Citi MasterCard and a Google Prepaid Card, which you’ll be able to fund with almost any payment card. From the outset, you’ll be able to tap your phone to pay wherever MasterCard PayPass is accepted. Google Wallet will also sync your Google Offers, which you’ll be able to redeem via NFC at participating SingleTap™ merchants, or by showing the barcode as you check out. Many merchants are working to integrate their offers and loyalty programs with Google Wallet.


With Google Wallet, we’re building an open commerce ecosystem, and we’re planning to develop APIs that will enable integration with numerous partners. In the beginning, Google Wallet will be compatible with Nexus S 4G by Google, available on Sprint. Over time, we plan on expanding support to more phones.


To learn more please visit our Google Wallet website at www.google.com/wallet.


This is just the start of what has already been a great adventure towards the future of mobile shopping. We’re incredibly excited and hope you are, too.

Check-ins and rating places get easier with Google Maps 5.5 for Android

(Cross posted from Google LatLong Blog)

We’ve made it easier to check in and out of places, rate various locations, and get transit information with Google Maps 5.5 for Android. This release adds ‘check in’ and ‘rate and review’ buttons to Place pages, the option to edit your home/work address for Latitude, and redesigned transit station pages.

Read below for more details about the new features, which we hope will improve your user experience, a topic we take very seriously as there are now more than 200 million users of Google Maps for mobile across platforms and devices worldwide.

New check-in and rating buttons added to Place pages

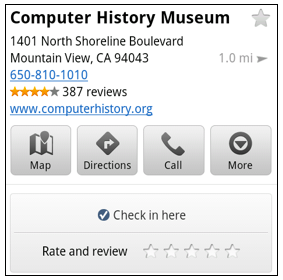
Now when you open a Place page from your mobile device, you can check in to places with Google Latitude or submit a rating or review by clicking on two new buttons at the top of the listing.

This past week I had the chance to explore the Computer History Museum during my visit to San Francisco from across the pond in London. Once nearby, I could quickly open the museum’s Place page and check in.

When I was ready to leave and head to lunch, in a few seconds I could go back to the Place page and rate the museum – which certainly earned the 5 star rating it received from me.

Update home and work address for your Latitude Location History

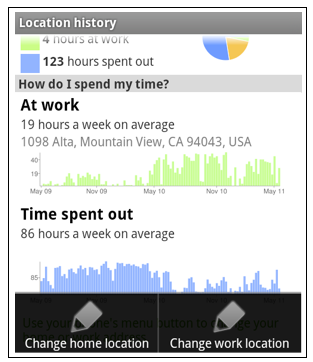
Last month we released the Location History dashboard for Latitude which estimates how much time you spend at home, work, and everywhere else. If your home or work address changes, or you’d rather set a different address to represent ‘home’ and ‘work,’ you can now edit these addresses within Latitude.

Change home/work location from Location History dashboard

View the redesigned transit station pages

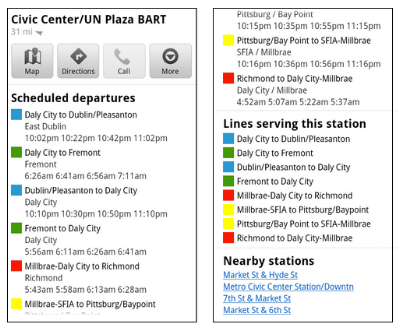
It’s been about two years since we added transit directions in Google Maps for Android. Since then, we’ve increased the coverage from 250 cities to more than 440 and counting - the most recent being Washington, D.C. To make it easier to plan your transit route, we updated the transit station pages in this release to better organize the information you need.

Each page now includes a list of upcoming scheduled departures for different lines, all the transit lines serving the station, and links to nearby transit stations.


Download Google Maps 5.5 for Android here to try out the new check-in and rating buttons, update your Latitude Location History home/work address, check out a transit station in a nearby city, or just make sure you have the latest version of Google Maps for Android. This update requires an Android OS 1.6+ device anywhere Google Maps is currently available. Learn more in our help center.

ADK at Maker Faire

This weekend is Maker Faire, and Google is all over it.

Following up on yesterday’s ADK post, we should take this opportunity to note that the Faire has chased a lot of ADK-related activity out of the woodwork. The level of traction is pretty surprising giving that this stuff only decloaked last week.

Convenience Library

First, there’s a new open-source project called Easy Peripheral Controller. This is a bunch of convenience/abstraction code; its goal is to help n00bs make their first robot or hardware project with Android. It takes care of lots of the mysteries of microcontroller wrangling in general and Arduino in particular.

Bits and Pieces from Googlers at the Faire

Most of these are 20%-project output.

Project Tricorder: Using the ADK and Android to build a platform to support making education about data collection and scientific process more interesting.

Disco Droid: Modified a bugdroid with servos and the ADK to show off some Android dance moves.

Music Beta, by Google: Android + ADK + cool box with lights for a Music Beta demo.

Optical Networking: Optical network port connected to the ADK.

Interactive Game: Uses ultrasonic sensors and ADK to control an Android game.

Robot Arm: Phone controlling robot arm for kids to play with.

Bugdroids: Balancing Bugdroids running around streaming music from an Android phone.

The Boards

We gave away an ADK hardware dev kit sample to several hundred people at Google I/O, with the idea of showing manufacturers what kind of thing might be useful. This seems to have worked better than we’d expected; we know of no less than seven makers working on Android Accessory Development Kits. Most of these are still in “Coming Soon” mode, but you’ll probably be able to get your hands on some at the Faire.

  1. RT Technology's board is pretty much identical to the kit we handed out at I/O.

  2. SparkFun has one in the works, coming soon.

  3. Also, SparkFun’s existing IOIO product will be getting ADK-compatible firmware.

  4. Arduino themselves also have an ADK bun in the oven.

  5. Seeedstudio’s Seeeeduino Main Board.

  6. 3D Robotics’ PhoneDrone Board.

  7. Microchip’s Accessory Development Starter Kit.

It looks like some serious accessorized fun is in store!

Google Maps on your mobile browser

(Cross-posted from the Google Lat Long Blog)

With 40% of Google Maps usage on mobile devices, we want you to have a consistent Google Maps experience wherever you use it. So, today we’re announcing our updated Google Maps experience for mobile browsers on Android and iOS.

Now, when you visit maps.google.com on your phone or tablet’s browser and opt-in to share your location, you can use many of the same Google Maps features you’re used to from the desktop. This will allow you to:
  • See your current location
  • Search for what’s nearby with suggest and auto complete
  • Have clickable icons of popular businesses and transit stations
  • Get driving, transit, biking, and walking directions
  • Turn on satellite, transit, traffic, biking, and other layers
  • View Place pages with photos, ratings, hours, and more
  • When signed into your Google account, access your starred locations and My Maps
This past weekend, I was at a team off-site at a ropes course and needed to find a good deli spot to grab lunch. I opened Google Maps on my mobile browser and searched to locate a popular deli nearby. A few finger taps later, I had viewed photos and reviews on the deli’s Place page and found the quickest way to get there using driving directions- all from my mobile browser.

Google Maps for mobile browsers is platform independent - you will always get a consistent experience and the latest features without needing to install any updates, no matter what phone you use.

To get started exploring Google Maps in your mobile browser, go to http://maps.google.com or any domain where Google Maps is available. Learn more in our help center.

Launch a mobile business with The Guide to the App Galaxy

The Guide to the App Galaxy, which we showed off last week at Google I/O, is designed to help mobile app developers—regardless of platform—navigate the complexities of launching an app and building a business on mobile. As you maneuver through the "galaxy” using the arrow keys on your keyboard, you’ll get the basics about app promotion, monetization and measurement—with tips from Google as well as successful developers. Read more on the Official Google Blog.

Post content by Lauren Usui, 

A Bright Idea: Android Open Accessories

[This post is by Justin Mattson, an Android Developer Advocate, and Erik Gilling, an engineer on the Android systems team. — Tim Bray]

Android’s USB port has in the past been curiously inaccessible to programmers. Last week at Google I/O we announced the Android Open Accessory APIs for Android. These APIs allow USB accessories to connect to Android devices running Android 3.1 or Android 2.3.4 without special licensing or fees. The new “accessory mode” does not require the Android device to support USB Host mode. This post will concentrate on accessory mode, but we also announced USB Host mode APIs for devices with hardware capable of supporting it.

To understand why having a USB port is not sufficient to support accessories let’s quickly look at how USB works. USB is an asymmetric protocol in that one participant acts as a USB Host and all other participants are USB Devices. In the PC world, a laptop or desktop acts as Host and your printer, mouse, webcam, etc., is the USB Device. The USB Host has two important tasks. The first is to be the bus master and control which device sends data at what times. The second key task is to provide power, since USB is a powered bus.

The problem with supporting accessories on Android in the traditional way is that relatively few devices support Host mode. Android’s answer is to turn the normal USB relationship on its head. In accessory mode the Android phone or tablet acts as the USB Device and the accessory acts as the USB Host. This means that the accessory is the bus master and provides power.

Establishing the Connection

Building an Open Accessory is simple as long as you include a USB host and can provide power to the Android device. The accessory needs to implement a simple handshake to establish a bi-directional connection with an app running on the Android device.

The handshake starts when the accessory detects that a device has been connected to it. The Android device will identify itself with the VID/PID that is appropriate based on the manufacturer and model of the device. The accessory then sends a control transaction to the Android device asking if it supports accessory mode.

Once the accessory confirms the Android device supports accessory mode, it sends a series of strings to the Android device using control transactions. These strings allow the Android device to identify compatible applications as well as provide a URL that Android will use if a suitable app is not found. Next the accessory sends a control transaction to the Android device telling it to enter accessory mode.

The Android device then drops off the bus and reappears with a new VID/PID combination. The new VID/PID corresponds to a device in accessory mode, which is Google’s VID 0x18D1, and PID 0x2D01 or 0x2D00. Once an appropriate application is started on the Android side, the accessory can now communicate with it using the first Bulk IN and Bulk OUT endpoints.

The protocol is easy to implement on your accessory. If you’re using the ADK or other USB Host Shield compatible Arduino you can use the AndroidAccessory library to implement the protocol. The ADK is one easy way to get started with accessory mode, but any accessory that has the required hardware and speaks the protocol described here and laid out in detail in the documentation can function as an Android Open Accessory.

Communicating with the Accessory

After the low-level USB connection is negotiated between the Android device and the accessory, control is handed over to an Android application. Any Android application can register to handle communication with any USB accessory. Here is how that would be declared in your AndroidManifest.xml:

<activity android:name=".UsbAccessoryActivity" android:label="@string/app_name">
<intent-filter>
<action android:name="android.hardware.usb.action.USB_ACCESSORY_ATTACHED" />
</intent-filter>

<meta-data android:name="android.hardware.usb.action.USB_ACCESSORY_ATTACHED"
android:resource="@xml/accessory_filter" />
</activity>

Here's how you define the accessories the Activity supports:

<resources>
<usb-accessory manufacturer="Acme, Inc" model="Whiz Banger" version="7.0" />
</resources>

The Android system signals that an accessory is available by issuing an Intent and then the user is presented with a dialog asking what application should be opened. The accessory-mode protocol allows the accessory to specify a URL to present to the user if no application is found which knows how communicate with it. This URL could point to an application in Android Market designed for use with the accessory.

After the application opens it uses the Android Open Accessory APIs in the SDK to communicate with the accessory. This allows the opening of a single FileInputStream and single FileOutputStream to send and receive arbitrary data. The protocol that the application and accessory use is then up to them to define.

Here’s some basic example code you could use to open streams connected to the accessory:

public class UsbAccessoryActivity extends Activity {
private FileInputStream mInput;
private FileOutputStream mOutput;

private void openAccessory() {
UsbManager manager = UsbManager.getInstance(this);
UsbAccessory accessory = UsbManager.getAccessory(getIntent());

ParcelFileDescriptor fd = manager.openAccessory(accessory);

if (fd != null) {
mInput = new FileInputStream(fd);
mOutput = new FileOutputStream(fd);
} else {
// Oh noes, the accessory didn’t open!
}
}
}

Future Directions

There are a few ideas we have for the future. One issue we would like to address is the “power problem”. It’s a bit odd for something like a pedometer to provide power to your Nexus S while it’s downloading today’s walking data. We’re investigating ways that we could have the USB Host provide just the bus mastering capabilities, but not power. Storing and listening to music on a phone seems like a popular thing to do so naturally we’d like to support audio over USB. Finally, figuring out a way for phones to support common input devices would allow for users to be more productive. All of these features are exciting and we hope will be supported by a future version of Android.

Accessory mode opens up Android to a world of new possibilities filled with lots of new friends to talk to. We can’t wait to see what people come up with. The docs and samples are online; have at it!

[Android/USB graphic by Roman Nurik.]

Google Search app for iOS, now even faster and easier to use

Two months ago, we launched a redesign of the Google Search app for iOS. We were happy that many of you liked the new look and interactivity of the app. However, we also heard your feedback about the app’s speed. Today we’re introducing changes that make the app more responsive as well as other visual changes that make search results even easier to read.

Faster app performance

This version of Google Search app is up to 20% more responsive as you type search queries and interact with it. As part of the speed improvements, a feature called “Just Talk” will now be off by default. Just Talk allowed you to search via voice just by bringing the phone to your ear and speaking rather than tapping the microphone icon. Turning off this feature may improve app performance, though you can easily re-enable it under the Settings > Voice Search menu.

Turn Just Talk on or off


Improved look & feel for search results

When searching on a phone, the small screen sometimes makes it difficult to read small fonts or to tap precisely on a link. To help you read and tap with ease, we’ve made the font of our search results bigger and the entire search result is now a tap target rather than just the link.

See the difference between previous (left) and new interface (right) with results now easier to read and select


Thank you for your feedback. Please continue to let us know how we can improve your experience by going to Settings > Help and Feedback > Feedback.

Google Search app is available for devices running iOS 3.0 and above. Download it from the App Store or by scanning the QR code below:


Introducing “News near you” on Google News for mobile

(Cross-posted from the Google News blog)

Google News for mobile lets you keep up with the latest news, wherever you are. Today we’re excited to announce a new feature in the U.S. English edition called “News near you” that surfaces news relevant to the city you’re in and surrounding areas.

Location-based news first became available in Google News in 2008, and today there’s a local section for just about any city, state or country in the world with coverage from thousands of sources. We do local news a bit differently, analyzing every word in every story to understand what location the news is about and where the source is located.

Now you can find local news on your smartphone. Here’s an example of a “News near you” mobile section automatically created for someone in Topeka, Kansas:


To use this feature, visit Google News from the browser of your Android smartphone or iPhone. If this is the first time you are visiting Google News on your phone since this feature became available, a pop-up will ask you if you want to share your location. If you say yes, news relevant to your location will appear in a new section called “News near you” which will be added at the bottom of the homepage. You can reorganize the sections later via the personalization page.


You can turn off the feature at any time either by hiding the section in your personalization settings or by adjusting your mobile browser settings. Please visit the Help Center for further details.

So, go to news.google.com from your smartphone and get the latest news from wherever you are.


Posted by Navneet Singh, Product Manager, Google News

New ways to discover great apps on Android Market

We’ve seen tremendous growth in Android Market lately. With over 200,000 apps supporting over 300 Android devices, we’ve had 4.5 billion applications installed to date. But with so many apps available, how do you find the ones you really want? Whether you’re looking for the most popular apps, hot new apps, or just the very best apps available, we want to help make sure that you find what you’re looking for.

Today, we’re excited to announce 5 new features for Android Market focused on helping you find apps you’ll love.


  • New top app charts - We’ve revamped our top app charts to be fresher and country-specific, so you get the most current, relevant results. We’ve also added top new free, top new paid, and top grossing lists, all right on the Android Market home page.   
  • Editors’ Choice - These are some of the very best apps available for Android, as chosen by the Android Market staff. They span everything from games to productivity and beyond.   
  • Top Developers - We’re also recognizing those developers creating the highest quality, most popular, and most notable apps available on Android Market. They’ll get a special icon on our Android Market website, appearing wherever the developer name is shown, starting today for an initial set of over 150 developers.
  • Better related apps - On the left side of an app page, you’ll now see two groups of related apps: apps frequently browsed by people who viewed this app, and apps that people tend to install alongside this app. For example, people who view ScoreMobile, my favorite sports score app, often also view other sports score apps, while those who install ScoreMobile tend to also install apps for specific sports leagues or teams. We’ll also show you related apps once you decide to install an app.
  • Trending apps - Finally, we’ve added a new section to the Android Market homepage showing trending apps – those apps that are quickly growing in daily installs. Look here to stay ahead of the curve and find new apps as they get hot.
We hope you find these features helpful as you explore the many greats apps available on Android Market. These new features are available now on http://market.android.com, and will be coming soon to Android Market on phones and tablets.


Posted by Fernando Delgado, Product Manager, Android Market

Android 3.1 Platform, New SDK tools

As we announced at Google I/O, today we are releasing version 3.1 of the Android platform. Android 3.1 is an incremental release that builds on the tablet-optimized UI and features introduced in Android 3.0. It adds several new features for users and developers, including:

  • Open Accessory API. This new API provides a way for Android applications to integrate and interact with a wide range of accessories such as musical equipment, exercise equipment, robotics systems, and many others.
  • USB host API. On devices that support USB host mode, applications can now manage connected USB peripherals such as audio devices. input devices, communications devices, and more.
  • Input from mice, joysticks, and gamepads. Android 3.1 extends the input event system to support a variety of new input sources and motion events such as from mice, trackballs, joysticks, gamepads, and others.
  • Resizable Home screen widgets. Developers can now create Home screen widgets that are resizeable horizontally, vertically, or both.
  • Media Transfer Protocol (MTP) Applications can now receive notifications when external cameras are attached and removed, manage files and storage on those devices, and transfer files and metadata to and from them.
  • Real-time Transport Protocol (RTP) API for audio. Developers can directly manage on-demand or interactive data streaming to enable VOIP, push-to-talk, conferencing, and audio streaming.

For a complete overview of what’s new in the platform, see the Android 3.1 Platform Highlights.

To make the Open Accessory API available to a wide variety of devices, we have backported it to Android 2.3.4 as an optional library. Nexus S is the first device to offer support for this feature. For developers, the 2.3.4 version of the Open Accessory API is available in the updated Google APIs Add-On.

Alongside the new platforms, we are releasing an update to the SDK Tools (r11).

Visit the Android Developers site for more information about Android 3.1, Android 2.3.4, and the updated SDK tools. To get started developing or testing on the new platforms, you can download them into your SDK using the Android SDK Manager.

Google I/O: countdown to the keynote kickoff

(Cross-posted from the Code Blog)

In less than 24 hours, we’ll be kicking off Google I/O 2011, our annual developer conference here in San Francisco. This year’s keynote presentations will highlight the biggest opportunities for developers and feature two of our most popular and important developer platforms: Android and Chrome. Google engineers from Andy Rubin and Sundar Pichai’s teams will unveil new features, preview upcoming updates, and provide new insights into the growing momentum behind these platforms.

Plus, for the first time in Google I/O history, you’ll be able to join us throughout the two days at I/O Live. We’ll live stream the two keynote presentations, two full days of Android and Chrome technical sessions, and the After Hours party. Recorded videos from all sessions across eight product tracks will be available within 24 hours after the conference. Whether you’ll be joining us in San Francisco or from the farthest corner of the world, bookmark www.google.com/io and check back on May 10 at 9:00 a.m. PDT for a fun treat as we count down to 00:00:00:00.

Posted by Vic Gundotra, Senior Vice President of Engineering

Share and personalize your Google Goggles experience with Goggles 1.4

Since its launch, we have worked to make Google Goggles faster and more accurate when returning search results for a wide variety of images. Today, we are taking several steps to make Goggles a better and more personal experience. Goggles 1.4 for Android devices introduces an enhanced search history experience, the ability to suggest better results to Google if we are not able to accurately match your image, and improved business card recognition.

Enhanced search history
The new search history experience lets you search your Goggles results, make personal notes on specific results and share your results with friends. When you add a personal note to a Goggles result, the note will appear in your search history. I’m trying to learn more about wine, so when I taste something new, it’s easy for me to add a note to help me remember what I liked about the wine. Later, I can search my search history for words in my note to help me find that bottle that went so well with steak. Read more about how to enable search history for Goggles here.

To make a personal note, tap the pencil in the corner when viewing a search result.

Notes are intended to help you better organize your search history, so if you choose to share a result with a friend, your notes will not be shared. However, you can always add a personalized message to your friend when you share your results with them.

Share a result by sending a link to your friends.


Suggest a better result
We are constantly working to improve the accuracy of Goggles at recognizing certain categories of items, but visual recognition is still a complicated task. With Goggles 1.4, you are now able to suggest a better result when Goggles cannot find an image match, or the quality of the result is poor.

To send your suggestion to Google, tap “Can you suggest a better result?” on the results page. You can then select the relevant part of the image and submit a tag. Tags will be used to improve recognition in object categories where Goggles already provides some results, like artwork or wine bottles.

When suggesting a better result, you can crop the image and add a description.


Improved business card recognition
Business card recognition is one of the most popular uses of Google Goggles, so we're rolling out some new updates to make the experience even quicker and easier. Additionally, instead of simply recognizing the content as text, Goggles now recognizes the information as a contact, making it easier to add to your phone's contact list.

Call or add the person directly as a contact

Google Goggles is available for Android 1.6+ devices. Download it by visiting Android Market or by scanning the QR code below:

Commerce Tracking with Google Analytics for Android

[This post is by Jim Cotugno and Nick Mihailovski, engineers who work on Google Analytics — Tim Bray]

Today we released a new version of the Google Analytics Android SDK which includes support for tracking e-commerce transactions. This post walks you through setting it up in your mobile application.

Why It’s Important

If you allow users to purchase goods in your application, you’ll want to understand how much revenue your application generates as well as which products are most popular.

With the new e-commerce tracking functionality in the Google Analytics Android SDK, this is easy.

Before You Begin

In this post, we assume you’ve already configured the Google Analytics Android SDK to work in your application. Check out our SDK docs if you haven’t already.

We also assume you have a Google Analytics tracking object instance declared in your code:

GoogleAnalyticsTracker tracker;

Then in the activity’s onCreate method, you have initialized the tracker member variable and called start:

tracker = GoogleAnalyticsTracker.getInstance();
tracker.start("UA-YOUR-ACCOUNT-HERE", 30, this);

Setting Up The Code

The best way to track a transaction is when you’ve received confirmation for a purchase. For example, if you have a callback method that is called when a purchase is confirmed, you would call the tracking code there.

public void onPurchaseConfirmed(List purchases) {
// Use Google Analytics to record the purchase information here...
}

Tracking The Transaction

The Google Analytics Android SDK provides its own Transaction object to store values Google Analytics collects. The next step is to copy the values from the list of PurchaseObjects into a Transaction object.

The SDK’s Transaction object uses the builder pattern, where the constructor takes the required arguments and the optional arguments are set using setters:

Transaction.Builder builder = new Transaction.Builder(
purchase.getOrderId(),
purchase.getTotal())
.setTotalTax(purchase.getTotalTax())
.setShippingCost(purchase.getShippingCost()
.setStoreName(purchase.getStoreName());

You then add the transaction by building it and passing it to a Google Analytics tracking Object:

tracker.addTransaction(builder.build());

Tracking Each Item

The next step is to track each item within the transaction. This is similar to tracking transactions, using the Item class provided by the Google Analytics SDK for Android. Google Analytics uses the OrderID as a common ID to associate a set of items to it’s parent transaction.

Let’s say the PurchaseObject above has a list of one or more LineItem objects. You can then iterate through each LineItem and create and add the item to the tracker.

for (ListItem listItem : purchase.getListItems()) {
Item.Builder itemBuilder = new Item.Builder(
purchase.getOrderId(),
listItem.getItemSKU(),
listItem.getPrice(),
listItem.getCount())
.setItemCategory(listItem.getItemCategory())
.setItemName(listItem.getItemName());

// Now add the item to the tracker. The order ID is the key
// Google Analytics uses to associate this item to the transaction.
tracker.addItem(itemBuilder.build());
}

Sending the Data to Google Analytics

Finally once all the transactions and items have been added to the tracker, you call:

tracker.trackTransactions();

This sends the transactions to the dispatcher, which will transmit the data to Google Analytics.

Viewing The Reports

Once data has been collected, you can then log into the Google Analytics Web Interface and go to the Conversions > Ecommerce > Product Performance report to see how much revenue each product generated.

Here we see that many people bought potions, which generated the most revenue for our application. Also, more people bought the blue sword than the red sword, which could mean we need to stock more blue items in our application. Awesome!

Learning More

You can learn more about the new e-commerce tracking feature in the Google Analytics SDK for Android developer documentation.

What’s even better is that we’ll be demoing all this new functionality this year at Google IO, in the Optimizing Android Apps With Google Analytics session.

Google Earth optimized for Android-powered tablets

Cross-posted from the Official Google Blog

When we launched Google Earth in 2005, most of us were still using flip phones. At the time, the thought of being able to cart around 197 million square miles of Earth in your pocket was still a distant dream. Last year, that dream came to fruition for Android users when we released Google Earth for Android. With the recent release of tablets based on Android 3.0, we wanted to take full advantage of the large screens and powerful processors that this exciting new breed of tablets had to offer.

Today’s update to Google Earth for Android makes Earth look better than ever on your tablet. We’ve added support for fully textured 3D buildings, so your tour through the streets of Manhattan will look more realistic than ever. There’s also a new action bar up top, enabling easier access to search, the option to “fly to your location” and layers such as Places, Panoramio photos, Wikipedia and 3D buildings.

Moving from a mobile phone to a tablet was like going from a regular movie theatre to IMAX. We took advantage of the larger screen size, including features like content pop-ups appearing within Earth view, so you can see more information without switching back and forth between pages.

One of my favorite buildings to fly around in Google Earth has always been the Colosseum in Rome, Italy:


With the larger tablet screen, I can fly around the 3D Colosseum while also browsing user photos from Panoramio. The photos pop up within the imagery so I can interact with them without losing sight of the Colosseum and its surroundings. Also, by clicking on the layer button on the action bar, I can choose which layers I want to browse.

This version is available for devices with Android 2.1 and above. The new tablet design is available for devices with Android 3.0 (Honeycomb) and above. Please visit the Google Earth help center for more information.

To download or update Google Earth, head to m.google.com/earth in your device’s browser or visit Android Market. Enjoy a whole new world of Google Earth for tablets!

Google Voice and Sprint integration is live

Cross-posted from the Google Voice Blog

It’s official, the Google Voice integration with Sprint is now live!

As we mentioned when we first announced the integration, there are two ways to bring Google Voice to your Sprint mobile phone:

Option 1: Keep your Sprint number: Your Sprint number becomes your Google Voice number so that when people call your Sprint mobile number, it rings all the phones you want.

Option 2: Replace your Sprint number with your Google Voice number: All calls made and texts sent from your Sprint phone will display your Google Voice number.

In both cases, Google Voice replaces Sprint voicemail and international calls made from the Sprint phone will be connected by Google Voice.

For detailed instructions on how to get started with either option, visit google.com/voice/sprint.

This integration is currently only available to Sprint customers in the United States.

Posted by Patrick Moor, Software Engineer