Announcing Google Maps Navigation for Android 2.0

(cross-posted on the Official Google Blog)

Since 2005, millions of people have relied on Google Maps for mobile to get directions on the go. However, there's always been one problem: Once you're behind the wheel, a list of driving directions just isn't that easy to use. It doesn't tell you when your turn is coming up. And if you miss a turn? Forget it, you're on your own.

Today we're excited to announce the next step for Google Maps for mobile: Google Maps Navigation (Beta) for Android 2.0 devices.

This new feature comes with everything you'd expect to find in a GPS navigation system, like 3D views, turn-by-turn voice guidance and automatic rerouting. But unlike most navigation systems, Google Maps Navigation was built from the ground up to take advantage of your phone's Internet connection.

Here are seven features that are possible because Google Maps Navigation is connected to the Internet:

The most recent map and business data
When you use Google Maps Navigation, your phone automatically gets the most up-to-date maps and business listings from Google Maps — you never need to buy map upgrades or update your device. And this data is continuously improving, thanks to users who report maps issues and businesses who activate their listings with Google Local Business Center.

Search in plain English
Google Maps Navigation brings the speed, power and simplicity of Google search to your car. If you don't know the address you're looking for, don't worry. Simply enter the name of a business, a landmark or just about anything into the search box, and Google will find it for you. Then press "Navigate", and you're on your way.

Search by voice
Typing on a phone can be difficult, especially in the car, so with Google Maps Navigation, you can say your destination instead. Hold down the search button to activate voice search, then tell your phone what you want to do (like "Navigate to Pike Place in Seattle"), and navigation will start automatically.

Traffic view
Google Maps Navigation gets live traffic data over the Internet. A traffic indicator light in the corner of the screen glows green, yellow or red, depending on the current traffic conditions along your route. If there's a jam ahead of you, you'll know. To get more details, tap the light to zoom out to an aerial view showing traffic speeds and incidents ahead. And if the traffic doesn't look good, you can choose an alternate route.

Search along route
For those times when you're already on the road and need to find a business, Google Maps Navigation searches along your route to give you results that won't take you far from your path. You can search for a specific business by name or by type, or you can turn on popular layers, such as gas stations, restaurants or parking.

Satellite view
Google Maps Navigation uses the same satellite imagery as Google Maps on the desktop to help you get to your destination. Turn on the satellite layer for a high-resolution, 3D view of your upcoming route. Besides looking cool, satellite view can help you make sense of complicated maneuvers.

Street View
If you want to know what your next turn looks like, double-tap the map to zoom into Street View, which shows the turn as you'll see it, with your route overlaid. And since locating an address can sometimes be tricky, we'll show you a picture of your destination as you approach the end of your route, so you'll know exactly what to look for.

Since there's nothing quite like seeing the product in action, we made this video to demonstrate a real-life example:


The first phone to have Google Maps Navigation and Android 2.0 is the Droid from Verizon. Google Maps Navigation is initially available in the United States. And like other Google Maps features, Navigation is free.

Click here to learn more and browse a gallery of product screenshots. Take Google Maps Navigation for a spin, and bring Internet-connected GPS navigation with you in your car.

Announcing Android 2.0 support in the SDK!

I am excited to announce that the Android SDK now supports Android 2.0 (also known as Eclair).
Android 2.0 brings new developer APIs for sync, Bluetooth, and a few other areas. Using the new sync, account manager and contacts APIs, you can write applications to enable users to sync their devices to various contact sources. You can also give users a faster way to communicate with others by embedding Quick Contact within your application. With the new Bluetooth API, you can now easily add peer-to-peer connectivity or gaming to your applications. To get a more complete list of the new capabilities you can add to your applications, please go to the Android 2.0 highlights page.

Current developers can use the SDK Manager to add Android 2.0 support to their SDK as well as update their SDK Tools to revision 3. New developers can download the Android SDK from the download site. After the download, Android platforms must be added using the SDK Manager

The SDK Manager allows you to add new Android platforms to your SDK.

Android SDK Tools, revision 3 is required to develop for Android 2.0. It includes support for code coverage through the Ant build system, as well as Mac OS X 10.6 (Snow Leopard) support for the SDK and related tools. For those of you who develop using Eclipse, we are releasing ADT version 0.9.4 through the usual Eclipse update mechanism.

Over the next few months, we expect to see more and more Android devices being released. These devices will be running Android 1.5, 1.6, or 2.0. We are also planning a minor version update of Android 2.0 towards the end of the year, and that will be the last update for 2009. Below are some of the things you can do to be better prepared:

  • Download the Android 2.0 platform and make sure your existing apps continue to work on new devices running Android 2.0.

  • Make sure that your apps work when using the WVGA (800x480) & FWVGA (854x480) emulator skins. We expect devices with these types of screen, running Android 2.0 to be launched soon.

Checkout the video below for more information about Android 2.0.


The Iterative Web App: Auto-expanding Compose Boxes

On April 7th, we announced a new version of Gmail for mobile for iPhone and Android-powered devices. Among the improvements was a complete redesign of the web application's underlying code which allows us to more rapidly develop and release new features that users have been asking for, as explained in our first post. We'd like to introduce The Iterative Webapp, a series where we will continue to release features for Gmail for mobile. Today: Auto-expanding compose boxes

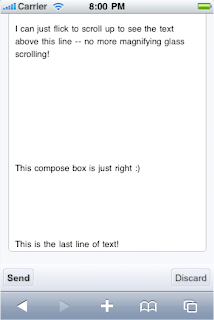
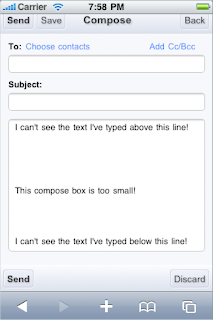
When composing a message on my phone, I really want to see as much of my draft as possible and make use of all the available screen space. One of my biggest gripes is a fixed-size compose box that restricts me to only a couple lines of visible text when my screen still has room to display more lines.

Today we launched auto-expanding compose boxes in Gmail for iPhone. This makes composing longer messages much easier since you're able to see more of the text you've typed. Just keep typing until you get near the bottom and then the compose box will magically expand by a few lines! As an added bonus, for all those iPhone users out there, auto-expanding compose boxes take away the need to press and hold to scroll with the magnifying glass! Instead, you can flick to scroll, much like you would normally do to scroll up and down a webpage. (On Android-powered devices, this hasn't been much of a problem, thanks to the trackball.)


While we're on the subject of making it easier to view content in Gmail, one more bit of news. We've been working on ways to make inline images show up in your messages, and you can now get some of those images to display by following these steps.

To try out, visit gmail.com on your iPhone/iPod touch (OS 2.2.1 or above, US English only) and create a home screen link for easy access.


by Casey Ho, Software Engineer, Google Mobile

UI framework changes in Android 1.6

Android 1.6 introduces numerous enhancements and bug fixes in the UI framework. Today, I'd like to highlight three two improvements in particular.

Optimized drawing

The UI toolkit introduced in Android 1.6 is aware of which views are opaque and can use this information to avoid drawing views that the user will not be able to see. Before Android 1.6, the UI toolkit would sometimes perform unnecessary operations by drawing a window background when it was obscured by a full-screen opaque view. A workaround was available to avoid this, but the technique was limited and required work on your part. With Android 1.6, the UI toolkit determines whether a view is opaque by simply querying the opacity of the background drawable. If you know that your view is going to be opaque but that information does not depend on the background drawable, you can simply override the method called isOpaque():

@Override
public boolean isOpaque() {
return true;
}

The value returned by isOpaque() does not have to be constant and can change at any time. For instance, the implementation of ListView in Android 1.6 indicates that a list is opaque only when the user is scrolling it.

Updated: Our apologies—we spoke to soon about isOpaque(). It will be available in a future update to the Android platform.

More flexible, more robust RelativeLayout

RelativeLayout is the most versatile layout offered by the Android UI toolkit and can be successfully used to reduce the number of views created by your applications. This layout used to suffer from various bugs and limitations, sometimes making it difficult to use without having some knowledge of its implementation. To make your life easier, Android 1.6 comes with a revamped RelativeLayout. This new implementation not only fixes all known bugs in RelativeLayout (let us know when you find new ones) but also addresses its major limitation: the fact that views had to be declared in a particular order. Consider the following XML layout:

<?xml version="1.0" encoding="utf-8"?>

<RelativeLayout xmlns:android="http://schemas.android.com/apk/res/android"
android:layout_width="fill_parent"
android:layout_height="64dip"
android:padding="6dip">

<TextView
android:id="@+id/band"
android:layout_width="fill_parent"
android:layout_height="26dip"

android:layout_below="@+id/track"
android:layout_alignLeft="@id/track"
android:layout_alignParentBottom="true"

android:gravity="top"
android:text="The Airborne Toxic Event" />

<TextView
android:id="@id/track"
android:layout_marginLeft="6dip"
android:layout_width="fill_parent"
android:layout_height="26dip"

android:layout_toRightOf="@+id/artwork"

android:textAppearance="?android:attr/textAppearanceMedium"
android:gravity="bottom"
android:text="Sometime Around Midnight" />

<ImageView
android:id="@id/artwork"
android:layout_width="56dip"
android:layout_height="56dip"
android:layout_gravity="center_vertical"

android:src="@drawable/artwork" />

</RelativeLayout>

This code builds a very simple layout—an image on the left with two lines of text stacked vertically. This XML layout is perfectly fine and contains no errors. Unfortunately, Android 1.5's RelativeLayout is incapable of rendering it correctly, as shown in the screenshot below.

The problem is that this layout uses forward references. For instance, the "band" TextView is positioned below the "track" TextView but "track" is declared after "band" and, in Android 1.5, RelativeLayout does not know how to handle this case. Now look at the exact same layout running on Android 1.6:

As you can see Android 1.6 is now better able to handle forward reference. The result on screen is exactly what you would expect when writing the layout.

Easier click listeners

Setting up a click listener on a button is very common task, but it requires quite a bit of boilerplate code:

findViewById(R.id.myButton).setOnClickListener(new View.OnClickListener() {
public void onClick(View v) {
// Do stuff
}
});

One way to reduce the amount of boilerplate is to share a single click listener between several buttons. While this technique reduces the number of classes, it still requires a fair amount of code and it still requires giving each button an id in your XML layout file:

View.OnClickListener handler = View.OnClickListener() {
public void onClick(View v) {
switch (v.getId()) {
case R.id.myButton: // doStuff
break;
case R.id.myOtherButton: // doStuff
break;
}
}
}

findViewById(R.id.myButton).setOnClickListener(handler);
findViewById(R.id.myOtherButton).setOnClickListener(handler);

With Android 1.6, none of this is necessary. All you have to do is declare a public method in your Activity to handle the click (the method must have one View argument):

class MyActivity extends Activity {
public void myClickHandler(View target) {
// Do stuff
}
}

And then reference this method from your XML layout:

<Button android:onClick="myClickHandler" />

This new feature reduces both the amount of Java and XML you have to write, leaving you more time to concentrate on your application.

The Android team is committed to helping you write applications in the easiest and most efficient way possible. We hope you find these improvements useful and we're excited to see your applications on Android Market.

Google Custom Search for mobile

Google Custom Search makes it easy for web site owners to add Google-powered search boxes to their sites. Since a rapidly growing percentage of web search traffic originates from smartphones, we're pleased to announce that Google Custom Search now formats search results for mobile phones.

If you own a web site and add a Google Custom Search box to it, when your users access the site on an Android-powered phone, iPhone, iPod Touch, or Palm Pre, they will can see optimized search results formatted for these devices. When they search on your web site, they are can be redirected to a Google-hosted Custom Search mobile results page created specifically for your Custom Search engine. If you'd like to serve these mobile results from your own web site, you can host your own version of the mobile Custom Search home page.


You can test this out on your phone right now. Here are a few samples: search for user-generated content (e.g., search for "zakumi") from sites like Wikipedia or Knol, or look for more information on Custom Search (e.g., search for "promotion"). As you can see, Custom Mobile Search results can match the look and feel of your own website, and we've enabled interactive features, such as label tabs for navigation, as well as promotions. Look for more features coming soon, too. For more information on Custom Search, and more details on the mobile configuration, visit the Custom Search blog.

Let us know how this works on your favorite smartphone.

Update on 10/23 @ 9:06 AM: Note that some configuration is required for the mobile-formatted results to be shown.

Layers come to Google Maps for BlackBerry

We're excited to announce that version 3.2 of Google Maps for mobile is now available for BlackBerry. This release contains many of the same features we recently launched on Windows Mobile and S60, including Layers.

Layers make it easy to view various types of information on your map and are especially helpful in situations when you're traveling somewhere new. For example, you can turn on the Wikipedia layer to read entries about nearby places, then use the transit lines layer to help map out a route. Or you can use the My Maps feature of Google Maps to create a collection of places you're planning to visit on your trip and then use Google Maps for mobile to access it from the road. You can also turn on the Google Latitude layer to see your friends' locations.

My coworker Mat is a big fan of Layers and made the below video to show you how he uses the feature. Check out the video, and get the latest version of Google Maps for your phone by visiting m.google.com/maps from your phone's browser.


Upload photos to Panoramio straight from your iPhone!

Panoramio is a community of people who enjoy sharing photos of places with the rest of the world. These photos are surfaced in Google Earth and Google Maps as photo layers, where millions of users can see them.

Panoramio has just launched an application that makes it easy to upload photos to Panoramio straight from your iPhone. Read about it on the Panoramio Blog. Also, we're working hard on the Android version, so keep an eye out for it!


Posted by Fernando Delgado, Product Manager, Panoramio Team