Video Chat on Your Android Phone

Sometimes, the expressions on a person's face can mean much more than what they say. To help you stay in touch with your friends and family, we’re launching Google Talk with video and voice chat for Android phones.

You can now video or voice chat with your friends, family and colleagues right from your Android phone, whether they’re on their compatible Android tablet or phone, or using Gmail with Google Talk on their computer. You can make calls over a 3G or 4G data network (if your carrier supports it) or over Wi-Fi.


In your Google Talk friends list, a video or voice chat button will appear next to your contacts and you can simply touch the button to connect with them. Any text chats from the person you’re talking with will be overlaid on your phone’s screen so you can read them without having to leave the video. And, if you need to check something else, the video pauses automatically so you can go back to your phone’s home screen or another app. The audio will keep going even though the video has paused. Check out how this works:


Google Talk with video and voice chat will gradually roll out to Nexus S devices in the next few weeks as part of the Android 2.3.4 over-the-air update and will launch on other Android 2.3+ devices in the future. To learn more about using video and voice chat, check out our Help Center.


Post content

Introducing the new Google Docs app for Android

(Cross posted on the Google Docs Blog, and Google Enterprise Blog)

Increasingly, people are using mobile phones to access information -- from email to web browsing to editing documents. Part of getting work done on the go is being able to easily access, edit and share content, which is why we’re happy to announce the new Google Docs app for Android.

With this new app it’s easy to filter and search for your content across any Google account, then jump straight into editing docs using the online mobile editors. The app also allows you to easily share items with contacts on your phone, right from within the app.


The Docs app also allows you to upload content from your phone and open documents directly from Gmail. You can also add a widget to your home screen for easy access to three core tasks: jumping to your starred documents, taking a photo to upload, or creating a new document with one tap.


And my favorite feature: Using the app and your phone’s camera, you can turn photos with text into editable Google documents with the power of optical character recognition (OCR). Just create a new ‘Document from Photo' or select the camera icon from the widget, and your converted document will appear in your documents list shortly after you snap the picture. You can also convert photos already stored on your phone by sharing them with the Google Docs app. OCR does a pretty good job capturing unformatted text in English but won't recognize handwriting or some fonts - stay tuned, it will get better over time!


The Google Docs app is currently available in English and works on Android 2.1+ phones. Try it out by scanning the QR code below or by visiting Android Market.


Let us know what you think of the new Google Docs Android app in our forum.


New Smartphone User Study and Webinar

79% of smartphone consumers use their phones to help with shopping, from comparing prices and finding more product info to locating a retailer, 72% use their smartphones while consuming other media, and 88% of those who look for local information on their smartphones take action within a day.

These are some of the key findings from “The Mobile Movement: Understanding Smartphone Users,” a study from Google and conducted by Ipsos OTX, an independent market research firm, among 5,013 US adult smartphone Internet users at the end of 2010.

Check out our post on the Google Mobile Ads blog for more of the study’s findings, or join us in tomorrow’s webinar where we’ll present the full research findings. In the meantime, enjoy this research highlights video.


Posted by Dai Pham, Google Mobile Ads Marketing Team

Merchant Sales Reports on Android Market

[This post is by Eric Chu, Android Developer Ecosystem. —Dirk Dougherty]

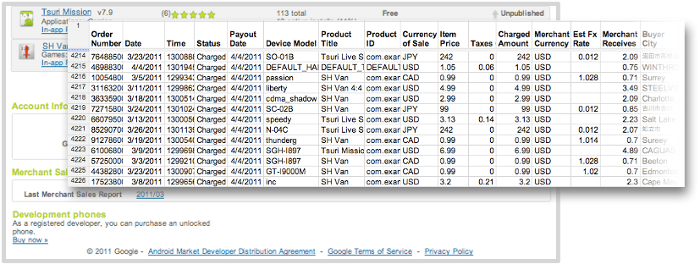
As part of our ongoing efforts to provide better tools to help you manage your business, we are introducing merchant sales reporting on Android Market. Developers now have convenient access to monthly reports that detail the financial performance of their applications directly from the Android Market Developer Console.

Based on Google Checkout financial data, these reports provide per-transaction details including additional information such as device information, currency of sale, and currency conversion rate. Developers will be able to easily download these reports as a CSV (comma-separated values) files to enable further analysis at their convenience.

Starting today, developers can download merchant sales reports for March 2011 from the Developer Console. Reports for months going back to January 2010 will be available in the coming weeks. Moving forward, sales reports for each month will be available by the 10th day of the following month.

We hope you’ll find these new sales reports useful. As always, please don’t hesitate to give us feedback through Market Help Center.

Undo certain Gmail actions in your mobile browser

Sometimes when I’m using Gmail on my phone, I delete a message by mistake or label it incorrectly. Sure I can fish the message out of my Trash or remove the label and apply the correct one, but that takes several steps. Even just a few seconds is usually enough time to catch those annoying mistakes.

Now when you use the Gmail mobile web app, you’ll have a small window of opportunity to undo four key actions: archive, delete, add or remove a label, or move a message/conversation.

When you take one of these actions, Gmail displays a yellow bar that recaps what you just did and allows you to undo it:


This bar stays in position even if you move to another screen (e.g. moving to ‘Menu’ from ‘Inbox’). If you don’t happen to catch your mistake in time, not to worry: all four actions can still be undone through other means (e.g. you can move a message from Trash back into your Inbox).

Try it out at gmail.com in the browser of your Android or iOS device.

Update: 9:09am Pacific time 4/19/11 - This update is available for phones running Android or iOS, but not tablet devices with the two-pane Gmail UI. It is also now available for BlackBerry OS 6.0 phones.

Listen to more languages in Google Translate for Android

(Cross-posted on the Google Translate blog)

Today we launched an update to Google Translate for Android that allows you to listen to translations in several more languages.

We’ve dramatically improved the quality of our spoken translations in over 15 languages, including Russian, Chinese and Portuguese, and added the ability to listen to three new languages: Japanese, Arabic and Korean. Text-to-speech is one of the most popular features of this mobile interface. Whether you’re learning how to say a foreign phrase, or trying to share information with someone in their language, simply tap the Speaker icon after doing a translation and you’ll hear the difference.


With today’s launch, Google Translate for Android supports translation between 58 languages and can speak translations in 24 languages. The application works on phones and tablets running Android 2.1 and above. To download Google Translate for Android, scan the QR code below, or visit us on the Android Market.


New Google News for Opera Mini

cross-posted from the Google News blog

While the Google News team has been hard at work redesigning our service for smartphones, we’ve also been thinking about our milllions of users around the world who access the web not from a smartphone, but from a feature phone, using Opera Mini as their browser.

So we have rolled out a redesigned Google News for Opera Mini in all 29 languages and 70 editions of Google News. This includes an enhanced homepage featuring richer snippets, thumbnail images, links to videos and section content without explicit navigation, a convenient search bar, comfortably spaced links and the ability to access your desktop personalization on your phone.

We hope that this will improve the news browsing experience for Opera Mini users around the world, including millions of people using a feature phone as the primary point of access for the web. See it here in the Indian Hindi and Nigerian English versions.


So, pick up your feature phone and point your Opera Mini browser to http://news.google.com to catch up on news anytime and anywhere. For more information or to share your feedback with us, please visit our Help Center.

Posted by Arun Prasath, Tech Lead and Dimitris Meretakis, Product Manager

Customizing the Action Bar

[This post is by Nick Butcher, an Android engineer who notices small imperfections, and they annoy him. — Tim Bray]

Since the introduction of the Action Bar design pattern, many applications have adopted it as a way to provide easy access to common actions. In Android 3.0 (or Honeycomb to its friends) this pattern has been baked in as the default navigation paradigm and extended to take advantage of the extra real-estate available on tablets. By using the Action Bar in your Honeycomb-targeted apps, you'll give your users a familiar way to interact with your application. Also, your app will be better prepared to scale across the range of Android devices that will be arriving starting in the Honeycomb era.

Just because Action Bars are familiar, doesn’t mean that they have to be identical! The following code samples and accompanying project demonstrate how to style the Action Bar to match your application’s branding. I’ll demonstrate how to take Honeycomb’s Holo.Light theme and customise it to match this blog’s colour scheme.

<style name="Theme.AndroidDevelopers" parent="android:style/Theme.Holo.Light">

</style>

Icon

This step is easy; I’ll use the wonderful Android Asset Studio to create an icon in my chosen colour scheme. For extra credit, I’ll use this image as a starting point to create a more branded logo.

Navigation

Next up, the navigation section of the Action Bar operates in three different modes; I’ll tackle each of these in turn.

Standard

The Action Bar’s standard navigation mode simply displays the title of the activity. This doesn’t require any styling... next!

List

To the left, a standard list drop-down; to the right, the effect we want to achieve.

The default styling in list navigation mode has a blue colour scheme. This is evident when touching the collapsed control in both the top bar, and the selection highlight in the expanded list. We can theme this element by overriding android:actionDropDownStyle with a custom style to implement our colour scheme:

<!-- style the list navigation -->
<style name="MyDropDownNav" parent="android:style/Widget.Holo.Light.Spinner.DropDown.ActionBar">
<item name="android:background">@drawable/ad_spinner_background_holo_light</item>
<item name="android:popupBackground">@drawable/ad_menu_dropdown_panel_holo_light</item>
<item name="android:dropDownSelector">@drawable/ad_selectable_background</item>
</style>

The above uses a combination of state list drawables and 9 patch images to style the collapsed spinner, the top bar of the expanded list and sets the highlight colour when picking an item.

Tabs

Here are the before-and-after shots on the tab navigation control:

The tab navigation control uses the standard blue colouring. We can apply a custom style to android:actionBarTabStyle to set our own custom drawable that uses our desired palette:

<!-- style for the tabs -->
<style name="MyActionBarTabStyle" parent="android:style/Widget.Holo.Light.ActionBarView_TabView">
<item name="android:background">@drawable/actionbar_tab_bg</item>
<item name="android:paddingLeft">32dp</item>
<item name="android:paddingRight">32dp</item>
</style>

Actions

Before-and-after on the individual items in the Action Bar:

The individual action items inherit the default blue background when selected. We can customise this behaviour by overriding android:selectableItemBackground and setting a shape drawable with our desired colouring:

<item name="android:selectableItemBackground">@drawable/ad_selectable_background</item>

The overflow menu also needs some attention as when expanded it shows a blue bar at the top of the list. We can override android:popupMenuStyle and set a custom drawable (in fact the very same drawable we previously used for list navigation) for the top of the overflow menu:

<!-- style the overflow menu -->
<style name="MyPopupMenu" parent="android:style/Widget.Holo.Light.ListPopupWindow">
<item name="android:popupBackground">@drawable/ad_menu_dropdown_panel_holo_light</item>
</style>

Selecting items within the overflow menu also show the default selection colour. We can set our customised selection colour by overriding android:dropDownListViewStyle:

<!-- style the items within the overflow menu -->
<style name="MyDropDownListView" parent="android:style/Widget.Holo.ListView.DropDown">
<item name="android:listSelector">@drawable/ad_selectable_background</item>
</style>

These changes gets us most of the way there but it’s attention to detail that makes an app. Check boxes and radio buttons within menu items in the overflow section are still using the default assets which have a blue highlight. Let’s override them to fit in with our theme:

<item name="android:listChoiceIndicatorMultiple">@drawable/ad_btn_check_holo_light</item>
<item name="android:listChoiceIndicatorSingle">@drawable/ad_btn_radio_holo_light</item>

Background

I’ve left the background transparent as inheriting form Holo.Light works well for our desired palette. If you’d like to customise it you easily override the android:background item on the android:actionBarStyle style:

<style name="MyActionBar" parent="android:style/Widget.Holo.Light.ActionBar">
<item name="android:background">@drawable/action_bar_background</item>
</style>

Bringing it all together

Putting all of these components together we can create a custom style:

<style name="Theme.AndroidDevelopers" parent="android:style/Theme.Holo.Light">
<item name="android:selectableItemBackground">@drawable/ad_selectable_background</item>
<item name="android:popupMenuStyle">@style/MyPopupMenu</item>
<item name="android:dropDownListViewStyle">@style/MyDropDownListView</item>
<item name="android:actionBarTabStyle">@style/MyActionBarTabStyle</item>
<item name="android:actionDropDownStyle">@style/MyDropDownNav</item>
<item name="android:listChoiceIndicatorMultiple">@drawable/ad_btn_check_holo_light</item>
<item name="android:listChoiceIndicatorSingle">@drawable/ad_btn_radio_holo_light</item>
</style>

We can then apply this style to either an individual activity or to the entire application:


<activity android:name=".MainActivity"
android:label="@string/app_name"
android:theme="@style/Theme.AndroidDevelopers"
android:logo="@drawable/ad_logo">

Note that some of the system styles that we have overridden in this example will affect much more than the Action Bar. For example overriding android:selectableItemBackground will effect many widgets which support a selectable state. This is useful for styling your entire application but be sure to test that your customisations are applied consistently throughout.

Familiar but styled

Customising the action bar is a great way to extend your application’s branding to the standard control components. With this power, as they say, comes great responsibility. When customising the user interface you must take great care to ensure that your application remains legible and navigable. In particular, watch out for highlight colours which contrast poorly with text and provide drawables for all relevant states. Explore this demo application which exercises the functionality offered by the Action Bar and demonstrates how to theme it.

Android Developer Challenge, Sub-Saharan Africa!

[This post is by Bridgette Sexton, an innovation advocate for the African tech community. — Tim Bray]

En Français.

In the past year alone, we have met with over 10,000 developers and techies across Sub Saharan Africa. We are continually impressed by the ingenuity and enthusiasm of this community in solving real problems with technology. From applications that crowd-source traffic info to mobile registration of local businesses, handheld devices have taken center stage for consumers and developers in Africa. With a number of countries in the region hovering around 80-90% mobile penetration, mobile is the screen size for the web and the communication experience.

Correspondingly, at every Google event in Africa, Android is the hottest topic; we know why. Every day over 300,000 Android devices are activated globally! A growing number of these mobile devices are powering on for the first time in emerging markets like those in Africa. As Android users multiply, so does the appeal to for developers of building apps on this free open-source platform.

An increasing number of users are searching for 'Android' on Google in Sub-Saharan Africa

For all these reasons and more, we are proud to be launching the Android Developer Challenge for Sub-Saharan Africa!

The Android Developer Challenge is designed to encourage the creation of cool and innovative Android mobile apps built by developers in Sub-Saharan Africa. Invent apps that delight users and you stand a chance to win an Android phone and $25,000 USD. To get started, choose from one of three defined eligible categories (see below), build an Android app in a team or by yourself, and submit it via the competition website by July 1st. The winning app will be announced on September 12th at G-Kenya. Get more details as well as Terms and Conditions on our site.

Categories for Entry:

  • Entertainment / Media / Games

  • Social Networking / Communication

  • Productivity / Tools / Lifestyle

(See Terms & Conditions for more details!)

To launch this competition, we have teamed up with Google Technology User Groups (GTUGs) across Africa to host Android Developer Challenge events. Check out our website for Android gatherings near you, and get coding!

New Carrier Billing Options on Android Market


[This post is by Eric Chu, Android Developer Ecosystem. —Dirk Dougherty]

Since last year, we’ve been working to bring the convenience of Direct Carrier Billing to more Android Market users on more carrier networks. Building on the launches to T-Mobile US and AT&T users in 2010, we’ve recently launched Direct Carrier Billing to users on three popular networks in Japan -- SoftBank, KDDI, and NTT DOCOMO.

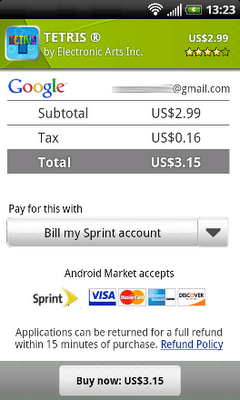
The momentum continues and today we’re excited to announce that Direct Carrier Billing is now available on Sprint. We've begun a phased roll-out of the service that will reach all users in the next few days. When complete, Android users on the Sprint network will be able to charge their Android Market purchases to their Sprint mobile bill with only a few clicks.

We believe that Direct Carrier Billing is a key payment option because it lets users purchase and pay for apps more easily. It’s also important because it offers a convenient way to buy in regions where credit cards are less common.

We are continuing to partner with more carriers around the world to offer carrier billing options to their subscribers. Watch for announcements of new payment options coming in the months ahead.

I think I’m having a Gene Amdahl moment (http://goo.gl/7v4kf)

[This post is by Andy Rubin, VP of Engineering —Tim Bray]

Recently, there’s been a lot of misinformation in the press about Android and Google’s role in supporting the ecosystem. I’m writing in the spirit of transparency and in an attempt to set the record straight. The Android community has grown tremendously since the launch of the first Android device in October 2008, but throughout we’ve remained committed to fostering the development of an open platform for the mobile industry and beyond.

We don’t believe in a “one size fits all” solution. The Android platform has already spurred the development of hundreds of different types of devices – many of which were not originally contemplated when the platform was first created. What amazes me is that even though the quantity and breadth of Android products being built has grown tremendously, it’s clear that quality and consistency continue to be top priorities. Miraculously, we are seeing the platform take on new use cases, features and form factors as it’s being introduced in new categories and regions while still remaining consistent and compatible for third party applications.

As always, device makers are free to modify Android to customize any range of features for Android devices. This enables device makers to support the unique and differentiating functionality of their products. If someone wishes to market a device as Android-compatible or include Google applications on the device, we do require the device to conform with some basic compatibility requirements. (After all, it would not be realistic to expect Google applications – or any applications for that matter – to operate flawlessly across incompatible devices). Our “anti-fragmentation” program has been in place since Android 1.0 and remains a priority for us to provide a great user experience for consumers and a consistent platform for developers. In fact, all of the founding members of the Open Handset Alliance agreed not to fragment Android when we first announced it in 2007. Our approach remains unchanged: there are no lock-downs or restrictions against customizing UIs. There are not, and never have been, any efforts to standardize the platform on any single chipset architecture.

Finally, we continue to be an open source platform and will continue releasing source code when it is ready. As I write this the Android team is still hard at work to bring all the new Honeycomb features to phones. As soon as this work is completed, we’ll publish the code. This temporary delay does not represent a change in strategy. We remain firmly committed to providing Android as an open source platform across many device types.

The volume and variety of Android devices in the market continues to exceed even our most optimistic expectations. We will continue to work toward an open and healthy ecosystem because we truly believe this is best for the industry and best for consumers.

See your location history dashboard and more with Google Maps 5.3 for Android

Today, we’re happy to announce Google Maps 5.3 for Android, which lets you see your Google Location History dashboard, check in at “home,” and add your own aspects for places when rating them.

Location History dashboard
If you’ve enabled Location History for Google Latitude, you’ve been able to visualize interesting trends in your location history with a personal dashboard at google.com/latitude on your computer. Now, you can also see your dashboard on your phone by tapping View location history from your Latitude profile. You’ll be able to see right on your phone how far you’ve travelled as well as an estimate of how much time you’ve spent at home, at work, or out.

If you haven’t yet, you can enable Location History from your computer or from Latitude’s Settings menu on your phone. Location History is 100% opt-in and is private to you and nobody else. You can always delete any of your location history from the Manage History tab or correct the estimated work and home locations from the dashboard on your computer.

View your location history dashboard from your Latitude profile on your phone and see estimates of where you’ve spent your time.

Check in at home
Now that you can see how much time you spend at “home”, you might want to let friends know when you’re there. Checking in at places using Latitude is another way to keep a history of places you’ve been and also lets you share when you’re there. I love letting friends and family know when I’m at a cafe or park, but sometimes I want them to know that I’m relaxing at home or made it back safely from a road trip. So now, I can start checking in at “home” in Latitude:
  1. Check in from Latitude and tap “Home - Tap to set your location” at the bottom of the nearby places list if you don’t have one yet.
  2. Use the estimated current address or enter in your home address yourself.
  3. Once you’ve checked in at home once, “Home” will appear at the top of the list when you’re checking in near there.

Like Latitude and other check-ins, checking in at home is entirely opt-in. Your set “home” location is not searchable and only you can check in there. Just like any other check-in, you can choose with whom to share your home check-ins (along with your name and address info).

Add your own aspects for places
When you’re rating places on the go in Maps using Google Places with Hotpot, you could always quickly leave feedback on a specific aspect or characteristic of a place, such as the food or ambiance. Before, we’d automatically include aspects about places that were commonly mentioned in reviews. Now, you can add your own aspects for each place. So if you think a place has a beautiful view or great music, you can add it yourself and quickly share it with the world.

When rating places, you can add your own aspects like “music” for places and leave quick feedback.

To get started, update Google Maps from Android Market on devices with Android OS 1.6+ anywhere Google Maps and Latitude are already available.

Meow Me Now

Search using your location is extremely helpful while on the go. Today, we’re excited to announce Meow Me Now, a new feature that lets you find the kittens that are near you. You can find kittens either by searching for [kittens] on google.com on your Android or iOS device, or by using the Near Me Now drop-down feature on the Google homepage.


Voice search to locate nearby kittens will also work on Android devices, and iOS devices with the Google Search App, so try meowing into your phone to find the kittens near you.

Posted by Yusuke Tabata, cat herder

The IO Ticket Contest

When Google I/O sold out so fast, were kicking around ideas for how to get some of our ticket reserve into the hands of our favorite people: Dedicated developers. Someone floated the idea of a contest, so we had to pull one together double-quick. You can read the questions and first-round answers here.

We thought you would enjoy some statistics, mostly rounded-off:

  • 2,800 people visited the contest page.

  • 360 people tried answering the questions.

  • 1 person got all six right.

  • 200 people did well enough to get into Round 2.

  • 70 people submitted apps.

  • 38 of the apps worked well enough to be worth considering.

  • 10 apps (exactly) got a “Nice” rating from the first-cut reviewer.

While we’re doing numbers, let’s investigate which of the Round-1 questions were hard. In decreasing order of difficulty, identified by correct answer, we find: Dalvik (97.5% correct), 160 (96%), Looper (58.5%), LLVM (57%), fyiWillBeAdvancedByHostKThx (43%), and PhoneNumberFormattingTextWatcher (19.5%).

So, our thanks to the people who put in the work, and a particular tip of the hat to the deranged hackers er I mean creative developers who built three particularly-outstanding apps:

First, to Kris Jurgowski, who pulled an all-nighter and wrote a nifty little app... on a Motorola CLIQ running Android 1.5! Next, to Heliodor Jalba, whose app had some gravity-warping extras and was less than 11K in size. And finally, to Charles Vaughn, whose app included a hilarious “Party Mode” that brought a smile to everyone’s face.